Magento Customer Address Entity
The Magento customer address entity is found in the database as a customer_address entity type found in the eav_entity_type table.
Similar to how customer attributes are created, we can use setup scripts from a custom module to add, modify or remove customer address attributes from the database.
First, the module’s declaration file needs to be added.
<?xml version="1.0"?>
<config>
    <modules>
        <Custom_Addressattribute>
            <codePool>local</codePool>
            <active>true</active>
        </Custom_Addressattribute>
    </modules>
</config>
Then the module’s config.xml file.
<?xml version="1.0"?>
<config>
    <modules>
        <Custom_Addressattribute>
            <version>1.0.0</version>
        </Custom_Addressattribute>
    </modules>
    <global>
        <resources>
            <custom_addressattribute_setup>
                <setup>
                    <module>Custom_Addressattribute</module>
                    <class>Mage_Customer_Model_Resource_Setup</class>
                </setup>
            </custom_addressattribute_setup>
        </resources>
    </global>
</config>
And finally, the install script.
<?php
$installer = $this;

$installer->startSetup();

$installer->addAttribute('customer_address', 'some_address_attribute_id', array(
    'label' => 'Some Address Attribute Label',
    'type' => 'varchar',
    'input' => 'text',
    'visible' => '1',
    'required' => '0',
    'user_defined' => '1'
));
$installer->endSetup();
Refreshing any page of Magento should now add your attribute into the database. It can be seen within the eav_attribute table.
Should you need to update the attribute already saved in your system, this can achieved by running an upgrade script. First, ensure that the value within the <version> nodes is higher than the version saved in the core_resource table.
<?xml version="1.0"?>
<config>
    <modules>
        <Custom_Addressattribute>
            <version>1.0.1</version>
        </Custom_Addressattribute>
    </modules>
    <global>
        <resources>
            <custom_addressattribute_setup>
                <setup>
                    <module>Custom_Addressattribute</module>
                    <class>Mage_Customer_Model_Resource_Setup</class>
                </setup>
            </custom_addressattribute_setup>
        </resources>
    </global>
</config>
Then add the upgrade script. For example, the below shows a change of the attribute label.
<?php
$installer = $this;

$installer->startSetup();

$installer->updateAttribute(
    'customer_address',
    'some_address_attribute_id',
    'frontend_label',
    'Some Other Address Label'
);

$installer->endSetup();
Remember the slight catch with updating attributes; the third argument passed in must match the column name within the database and not the alias name used.
So frontend_label will need to be used, whereas in the addAttribute() method, frontend_label or label could be used.
To remove an attribute from the system, the removeAttribute() method is used. To run this, we would need to set up an upgrade script similar to the above, except the script itself would contain the following contents.
<?php
$installer = $this;

$installer->startSetup();

$installer->removeAttribute('customer_address','some_address_attribute_id');

$installer->endSetup();
Just two parameters are used in the removeAttribute() method: the entity type code and the attribute code.
And if you haven’t already done so, don’t forget to set the value within the version nodes to match the latest resource version.
<?xml version="1.0"?>
<config>
<modules>
<Custom_Addressattribute>
<version>1.0.2</version>
</Custom_Addressattribute>
</modules>
<global>
<resources>
<custom_addressattribute_setup>
<setup>
<module>Custom_Addressattribute</module>
<class>Mage_Customer_Model_Resource_Setup</class>
</setup>
</custom_addressattribute_setup>
</resources>
</global>
</config>
When you have added your custom address attribute into the database, you’ll probably want to show the address attribute in different forms that Magento uses e.g. in the Manage Customers section in the admin or on the checkout page.
To do this, there is a used_in_forms property we can set using the Mage_Eav_Model_Config class. Let’s re-add the attribute and set the attribute to see used in the adminhtml_customer_address (used in the admin area) and the customer_address_edit (used for areas such as the checkout) forms.
<?xml version="1.0"?>
<config>
    <modules>
        <Custom_Addressattribute>
            <version>1.0.3</version>
        </Custom_Addressattribute>
    </modules>
    <global>
        <resources>
            <custom_addressattribute_setup>
                <setup>
                    <module>Custom_Addressattribute</module>
                    <class>Mage_Customer_Model_Resource_Setup</class>
            </custom_addressattribute_setup>
        </resources>
    </global>
</config>
<?php
$installer = $this;

$installer->startSetup();

$installer->addAttribute('customer_address', 'some_address_attribute_id', array(
    'label' => 'Some Address Attribute Label',
    'type' => 'varchar',
    'input' => 'text',
    'visible' => '1',
    'required' => '0',
    'user_defined' => '1'
));

$attribute = Mage::getSingleton('eav/config')
    ->getAttribute('customer_address', 'some_address_attribute_id')
    ->setData('used_in_forms', array('adminhtml_customer_address', 'customer_address_edit'))
    ->save();

$installer->endSetup();
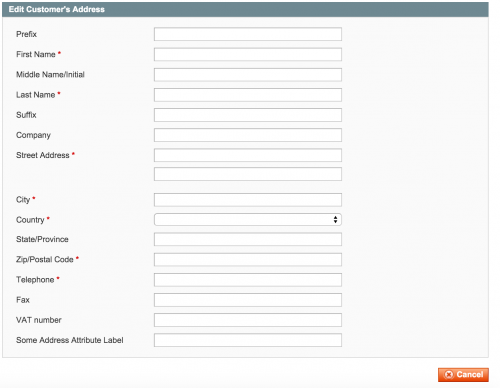
We should now have the attribute added into the database and also we can see the attribute appear within the admin when editing a customer’s address for example.
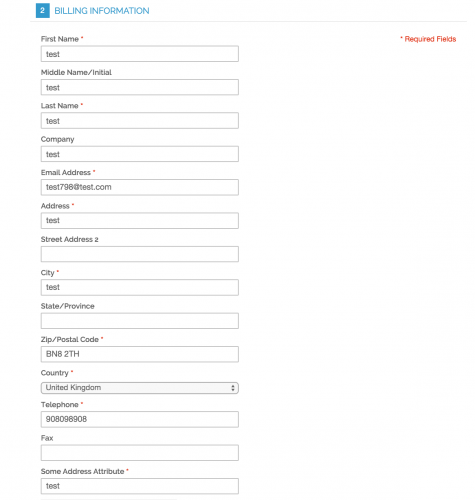
If we then head to the checkout page, our custom address field does not appear, even though we have included this attribute to be used in this form. Why is this?
If you the billing.phtml template file within your theme’s template/checkout/onepage directory, you will see that fields have been included as HTML. Furthermore, there is this line below.
<?php echo $this->getChildHtml('form.additional.info'); ?>
So it looks as though Magento gives us the ability to add additional fields to the checkout by adding a template file under the form.additional.info reference.
How can this be done? Firstly, we need to add our own custom layout file. We need to first declare this within our module’s config.xml file.
<config>
    <modules>
        ....
    </modules>
    <global>
        ....
    </global>
    <frontend>
        <layout>
            <updates>
                <custom_addressattribute>
                    <file>custom_addressattribute.xml</file>
                </custom_addressattribute>
            </updates>
        </layout>
    </frontend>
</config>
Then, place the layout file within your theme’s directory within the layout directory and add the code below.
<?xml version="1.0"?>
<layout>
    <checkout_onepage_index>
        <reference name="form.additional.info">
            <block type="checkout/onepage_billing" name="custom_addressattribute" template="custom_addressattribute/checkout/onepage/billing/addressattribute.phtml" />
        </reference>
    </checkout_onepage_index>
</layout>
Then, create the template file in the directory specified under the template property in the layout XML and add your field.
<div class="field">
    <label for="billing:some_address_attribute_id" class="required">
        <?php echo $this->__('Some Address Attribute') ?>
    </label>
    <div class="input-box">
        <input type="text" name="billing[some_address_attribute_id]" id="billing:some_address_attribute_id" value="<?php echo $this->escapeHtml($this->getAddress()->getSomeAddressAttributeID()) ?>" title="<?php echo $this->__('Some Address Attribute') ?>" class="input-text required-entry" />
    </div>
</div>
Now if we go to the checkout page, we can see our attribute field!
If your attribute is needed on the shipping step, then an override of the shipping.phtml will need to done. Magento does not have the $this->getChildHtml('form.additional.info') code in the shipping template.
There is one other thing that we need to do here, and that’s to add our attribute against the quote and order tables so that our address attribute gets saved to the quote record and eventually the order record. To do this, we’ll need to write another upgrade script and add in the following.
<?php
$installer = $this;

$installer->startSetup();

$installer->getConnection()->addColumn(
    $installer->getTable('sales/quote_address'),
    'some_address_attribute_id', array(
        'type' => Varien_Db_Ddl_Table::TYPE_TEXT,
        'comment' => 'New Address attribute field'
    )
);

$installer->getConnection()->addColumn(
    $installer->getTable('sales/order_address'),
    'some_address_attribute_id',
    array(
        'type' => Varien_Db_Ddl_Table::TYPE_TEXT,
        'comment' => 'New Address attribute field'
    )
);

$installer->endSetup();
The final thing to do is add some nodes into our config.xml file configuration that tells Magento what fields in the quote address table should be converted into an order address table. This is done by specifying a pair of sales_convert_quote_address nodes that represents the sales_flat_quote_address records. These nodes are also defined within a pair of fieldsets nodes.
<config>
    <global>
        <fieldsets>
            <sales_convert_quote_address>
                <some_address_attribute_id>
                    <to_order_address>*</to_order_address>
                    <to_customer_address>*</to_customer_address>
                </some_address_attribute_id>
            </sales_convert_quote_address>
        </fieldsets>
    </global>
</config>
Since we’re using a customer address attribute, we should also add a pair of to_customer_address nodes if the customer saves their address into their address book at the checkout.
If you then head into System -> Configuration -> Customer -> Customer Configuration and expand the Address Templates section, you can then add your custom attribute within the templates should you wish to display your attribute in a specific location.
Note: This article is based on Magento Community/Open Source version 1.9.