Create a Theme in Magento 2
Magento 2 Create Theme
Since the release of Magento 2, one of the first things developers look to do is to find out how to create a theme. As the directory structure and the admin interface is significantly different to Magento 1, it can be difficult to locate exactly where to modify the theme configuration.
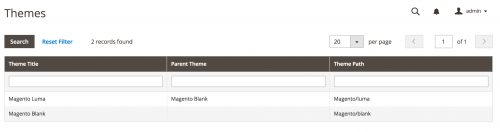
After the install process of Magento, log into the admin panel and head to Content -> Design -> Themes. Here you’ll be able to see a grid view of the current themes, any parent theme they inherit from and their theme path.
To add your own theme, you will need to create a directory structure within app/design/frontend that will include your vendor name and your theme name. In this example, the vendor name will be Sp and the theme name will be called customtheme. The directory structure then looks like the below.
app/design/frontend/Sp/customtheme
To declare our theme, we need to create a theme.xml file located within the same directory level. This file will declare the theme title, any parent theme the theme inherits from and a theme preview image which is just a thumbnail used in the admin panel.
It is recommended to create a theme that inherits from the Magento/blank theme.
<theme xmlns:xsi="http://www.w3.org/2001/XMLSchema-instance" xsi:noNamespaceSchemaLocation="urn:magento:framework:Config/etc/theme.xsd">
    <title>Custom Theme</title> <!-- your theme's name -->
    <parent>Magento/blank</parent> <!-- the parent theme, in case your theme inherits from an existing theme -->
    <media>
        <preview_image>media/preview.jpg</preview_image> <!-- the path to your theme's preview image -->
    </media>
</theme>
Next, we need to register our theme so that Magento can recognise it. A registration.php file should be created within the same directory level that contains the following:
<?php
\Magento\Framework\Component\ComponentRegistrar::register(
    \Magento\Framework\Component\ComponentRegistrar::THEME,
    'frontend/Sp/customtheme',
    __DIR__
);
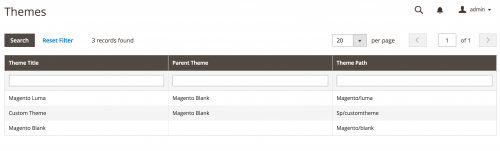
You should then see your custom theme added to the list of themes Magento recognises within the admin in the Content -> Design -> Themes section.
So to actually configure Magento to use your theme, head to Content -> Design -> Configuration and you can see this section.
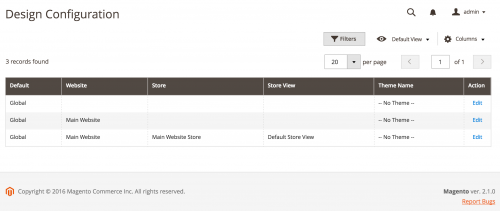
Choose the appropriate configuration scope to edit and you will be able to activate your custom theme.
Configuration such as product image sizes and other properties are stored in a view.xml file. Such configuration is required if using a theme, however it is optional if a parent theme contains this configuration.
The view.xml file belongs in an etc/ directory located within the theme’s directory. For example, to configure the small images sizes that are present on the category grid and list views, you could add the following:
<?xml version="1.0"?>
<view xmlns:xsi="http://www.w3.org/2001/XMLSchema-instance" xsi:noNamespaceSchemaLocation="urn:magento:framework:Config/etc/view.xsd">
    <media>
        <images module="Magento_Catalog">
            <image id="category_page_grid" type="small_image">
                <width>240</width>
                <height>300</height>
            </image>
            <image id="category_page_list" type="small_image">
                <width>240</width>
                <height>300</height>
            </image>
        </images>
    </media>
</view>
Magento 2 does not have a skin directory. This means that theme-specific CSS, fonts, images and JavaScript reside in a web/ directory within the theme’s directory level. The structure of this directory will look similar to this:
/web
    /css
        /source
    /fonts
    /images
    /js
Within Magento 2, the default format and name of a logo image is logo.svg This image is usually placed in the web/images directory. You can use a logo file with a different name and format, but you will need to declare it.
This declaration belongs in a default.xml file which should be added to the Magento_Theme/layout directory within your theme’s directory. Note that if this directory does not exist, you can create the folders.
The contents of the file should contain the location of the logo image, as well as the image width and height.
<page xmlns:xsi="http://www.w3.org/2001/XMLSchema-instance" xsi:noNamespaceSchemaLocation="urn:magento:framework:View/Layout/etc/page_configuration.xsd">
    <body>
        <referenceBlock name="logo">
            <arguments>
                <argument name="logo_file" xsi:type="string">images/some_logo_name.png</argument>
                <argument name="logo_img_width" xsi:type="number">300</argument>
                <argument name="logo_img_height" xsi:type="number">300</argument>
            </arguments>
        </referenceBlock>
    </body>
</page>
Now that the theme has been registered and configured, you can make customisations to layout and template files without affecting any of Magento’s core files.
Note: This article is based on Magento version 2.1.