Add a Checkout Step in Magento 2
It’s now easier to add a checkout step in Magento 2 than it ever was in earlier versions of Magento. Magento 2 has reduced the number of checkout from six to two.
Using a combination of JavaScript, Knockout and layout configuration, developers can add an additional step.
To start with, create and enable a custom module. This can be done by adding a registration.php and module.xml file.
<?php
\Magento\Framework\Component\ComponentRegistrar::register(
    \Magento\Framework\Component\ComponentRegistrar::MODULE,
    '[Vendor]_[Module]',
    __DIR__
);
<?xml version="1.0"?>
<config xmlns:xsi="http://www.w3.org/2001/XMLSchema-instance" xsi:noNamespaceSchemaLocation="urn:magento:framework:Module/etc/module.xsd">
    <module name="[Vendor]_[Module]" setup_version="1.0.0">
        <sequence>
            <module name="Magento_Checkout" />
        </sequence>
    </module>
</config>
Then, enable the module by running the following commands within the Magento root directory.
$ /path/to/your/php bin/magento module:enable [Vendor]_[Module]
$ /path/to/your/php bin/magento setup:upgrade
To define a new checkout step, define the layout within the checkout_index_index.xml file.
<?xml version="1.0"?>
<page xmlns:xsi="http://www.w3.org/2001/XMLSchema-instance" layout="1column" xsi:noNamespaceSchemaLocation="urn:magento:framework:View/Layout/etc/page_configuration.xsd">
    <body>
        <referenceBlock name="checkout.root">
            <arguments>
                <argument name="jsLayout" xsi:type="array">
                    <item name="components" xsi:type="array">
                        <item name="checkout" xsi:type="array">
                            <item name="children" xsi:type="array">
                                <item name="steps" xsi:type="array">
                                    <item name="children" xsi:type="array">

                                        <!-- The new step you add -->
                                        <item name="customstep" xsi:type="array">
                                            <item name="component" xsi:type="string">[Vendor]_[Module]/js/view/customstep</item>
                                            <item name="sortOrder" xsi:type="string">0</item>
                                            <item name="children" xsi:type="array">
                                                <!--add here child component declaration for your step-->
                                            </item>
                                        </item>

                                    </item>
                                </item>
                            </item>
                        </item>
                    </item>
                </argument>
            </arguments>
        </referenceBlock>
    </body>
</page>
It should be noted that in order to display the checkout step before the default shipping step, the sortOrder value should be less than 1.
To display the custom step between the shipping step and payment step, the sortOrder value should be greater than 1 but less than 2.
If the step needs to be displayed after the default payment step, set the sortOrder value to be greater than 2.
Next, add the customstep.js JavaScript file. This file should be added within the module’s view/frontend/web/js/view directory.
define(
    [
        'ko',
        'uiComponent',
        'underscore',
        'Magento_Checkout/js/model/step-navigator'
    ],
    function (
        ko,
        Component,
        _,
        stepNavigator
    ) {
        'use strict';
        /**
         *
         * customstep - is the name of the component's .html template,
         * [Vendor]_[Module]  - is the name of the your module directory.
         *
         */
        return Component.extend({
            defaults: {
                template: '[Vendor]_[Module]/customstep'
            },

            // Add here your logic to display step,
            isVisible: ko.observable(true),

            /**
             *
             * @returns {*}
             */
            initialize: function () {
                this._super();
                // Register your step
                stepNavigator.registerStep(
                    // Step code will be used as step content id in the component template
                    'customstep',
                    // Step alias
                    null,
                    // Step title value
                    'Custom Step',
                    //observable property with logic when display step or hide step
                    this.isVisible,

                    _.bind(this.navigate, this),

                    /**
                     * Sort order value
                     * 'sort order value' < 10: step displays before shipping step;
                     * 10 < 'sort order value' < 20 : step displays between shipping and payment step
                     * 'sort order value' > 20 : step displays after payment step
                     */
                    1
                );

                return this;
            },

            /**
             * The navigate() method is responsible for navigation between checkout step
             * during checkout. You can add custom logic, for example some conditions
             * for switching to your custom step
             */
            navigate: function () {

            },

            /**
             * @returns void
             */
            navigateToNextStep: function () {
                stepNavigator.next();
            }
        });
    }
);
Within this file, the isVisible property plays an important role. If the custom checkout step displays before the other steps, then the property can be set to true. However, if the step is set to be the middle or last step, then isVisible should be set to false with some logic to set it to true when previous checkout steps have been completed.
Lastly, add the Knockout template file defined in the JavaScript file above. This template should reside in the module’s web/frontend/web/template directory.
<li id="customstep" data-bind="fadeVisible: isVisible">
    <div class="step-title" data-bind="i18n: 'Custom Step Title'" data-role="title"></div>
    <div id="checkout-step-title"
         class="step-content"
         data-role="content">

        <form data-bind="submit: navigateToNextStep" novalidate="novalidate">
            <div class="actions-toolbar">
                <div class="primary">
                    <button data-role="opc-continue" type="submit" class="button action continue primary">
                        <span><!-- ko i18n: 'Next'--><!-- /ko --></span>
                    </button>
                </div>
            </div>
        </form>
    </div>
</li>
As the Magento DevDocs mention, the default shipping step’s isVisible property is set to true by default. Therefore, if you are adding a custom step before the shipping step, you might run into an issue where both steps are active at the same time.
To resolve this, define a mixin that overrides the isVisible property.
This can be done by adding a requirejs-config.js file within the custom module. The file contains the following contents.
var config = {
    'config': {
        'mixins': {
            'Magento_Checkout/js/view/shipping': {
                '[Vendor]_[Module]/js/view/shipping-payment-mixin': true
            },
            'Magento_Checkout/js/view/payment': {
                '[Vendor]_[Module]/js/view/shipping-payment-mixin': true
            }
        }
    }
}
Now create the shipping-payment-mixin.js file, and override the property.
define(
    [
        'ko'
    ], function (ko) {
        'use strict';

        var mixin = {
            initialize: function () {
                this.visible = ko.observable(false);
                this._super();

                return this;
            }
        };

        return function (target) {
            return target.extend(mixin);
        };
    }
);
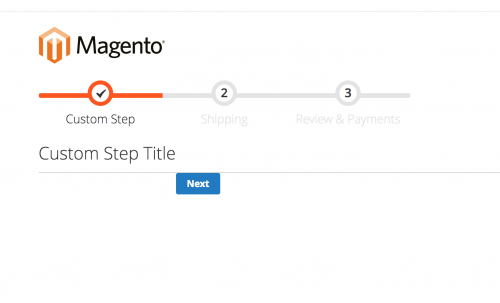
After regenerating static content and refreshing the cache, you should see the custom checkout step added to the checkout.
Note: This article is based on Magento Open Source version 2.2.