Add Custom CSS in Magento 2
One of the most common tasks a frontend developer will look to undertake is how to add custom CSS in Magento 2.
Like earlier versions of Magento, CSS files are added via layout XML. Within Magento 1, in your custom theme you could specify a local.xml layout file that contained all of layout updates.
Within this file, you could add CSS files using the following code.
<?xml version="1.0"?>
<layout>
    <default>
        <reference name="head">
            <action method="addItem">
                <type>skin_css</type>
                <name>css/custom.css</name>
            </action>
        </reference>
    </default>
</layout>
The code above assumes your CSS file would be located in Magento’s skin directory, and then within your theme’s folder.
Within Magento 2, the syntax to add stylesheets is slightly different, as well as the files themselves being added in a different location in the Magento 2 application.
If you’ve managed to create a Magento 2 theme already, then you’re ready to add additional CSS files to your theme.
To start with, it’s worth taking a look into how Magento 2 adds its own CSS in one of the core files.
Below is the code used within Magento’s blank theme.
<?xml version="1.0"?>
<page xmlns:xsi="http://www.w3.org/2001/XMLSchema-instance" xsi:noNamespaceSchemaLocation="urn:magento:framework:View/Layout/etc/page_configuration.xsd">
    <head>
        <css src="css/styles-m.css"/>
        <css src="css/styles-l.css" media="screen and (min-width: 768px)"/>
        <css src="css/print.css" media="print"/>
    </head>
</page>
The default_head_blocks.xml file, as the name suggests, is the file used to add layout updates to the default head block. This layout file resides in the Magento_Theme module.
So to add your own CSS, within your own custom theme, you can add a similar folder structure.
app/design/[Your_Package]/[your_theme]/Magento_Theme/layoutThen add a default_head_blocks.xml file and add the CSS file in the layout configuration.
<?xml version="1.0"?>
<page xmlns:xsi="http://www.w3.org/2001/XMLSchema-instance" xsi:noNamespaceSchemaLocation="../../../../../vendor/magento/framework/Module/etc/module.xsd">
    <head>
        <css src="css/custom.css" />
    </head>
</page>
The CSS file should then be added in the following directory.
app/design/[Your_Package]/[your_theme]/web/cssYou may notice that Magento 2’s CSS files will be requested from the pub/static folder. If you are running the Magento application in developer mode, then Magento will add these files from your theme’s directory to pub/static. If you’re running Magento in production mode, then after adding a custom CSS file, the static files will need to be regenerated.
Clear the original static files within the pub/static and run the following command.
$ php bin/magento setup:static-content:deployClick here to find out more about Magento modes.
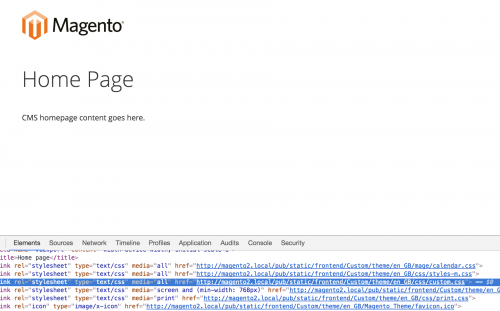
If you refresh your Magento store, you should be able to see your CSS file being included.
Sometimes within Magento it is common to add CSS files to specific pages, for example CSS styles that only apply to the customer login page.
Magento adds customer specific layout updates to the Magento_Customer module, so a Magento_Customer directory will need to be created alongside the existing Magento_Theme directory within your theme’s directory structure.
Then create the layout subdirectory and a customer_account_login.xml layout file and populate the file with the following contents.
<?xml version="1.0"?>
<page xmlns:xsi="http://www.w3.org/2001/XMLSchema-instance" xsi:noNamespaceSchemaLocation="../../../../../vendor/magento/framework/Module/etc/module.xsd">
    <head>
        <css src="css/customer-login.css" />
    </head>
</page>
Note: This article is based on Magento Community/Open Source version 2.1.