Add Customer and Customer Address Attributes in Magento 2
Sometimes the default attributes provided by Magento might not be enough. Here we explain how to add customer and customer address attributes in Magento 2.
If you have followed the post on how to add category attributes, you will know that Magento 2 uses the InstallData class.
This is no different to adding customer-related attributes, so ensure you have this class created like the below.
Add the Data Class
The InstallData class will be added within your module’s Setup directory. If you do not have a Setup directory, you can create an empty one.
The InstallData class will be called InstallData.php and will look similar to the example given below.
<?php
namespace [Vendor]\[Module]\Setup;

use Magento\Customer\Setup\CustomerSetupFactory;
use Magento\Customer\Model\Customer;
use Magento\Eav\Model\Entity\Attribute\Set as AttributeSet;
use Magento\Eav\Model\Entity\Attribute\SetFactory as AttributeSetFactory;
use Magento\Framework\Setup\InstallDataInterface;
use Magento\Framework\Setup\ModuleContextInterface;
use Magento\Framework\Setup\ModuleDataSetupInterface;

class InstallData implements InstallDataInterface
{
    private $customerSetupFactory;

    private $attributeSetFactory;

    public function __construct(
        CustomerSetupFactory $customerSetupFactory,
        AttributeSetFactory $attributeSetFactory
    ) {
        $this->customerSetupFactory = $customerSetupFactory;
        $this->attributeSetFactory = $attributeSetFactory;
    }

    public function install(ModuleDataSetupInterface $setup, ModuleContextInterface $context)
    {

        /** @var CustomerSetup $customerSetup */
        $customerSetup = $this->customerSetupFactory->create(['setup' => $setup]);

        $customerEntity = $customerSetup->getEavConfig()->getEntityType('customer');
        $attributeSetId = $customerEntity->getDefaultAttributeSetId();

        /** @var $attributeSet AttributeSet */
        $attributeSet = $this->attributeSetFactory->create();
        $attributeGroupId = $attributeSet->getDefaultGroupId($attributeSetId);

        $customerSetup->addAttribute(Customer::ENTITY, 'job_title', [
            'type' => 'varchar',
            'label' => 'Job Title',
            'input' => 'text',
            'required' => false,
            'visible' => true,
            'user_defined' => true,
            'sort_order' => 1000,
            'position' => 1000,
            'system' => 0,
        ]);

        $attribute = $customerSetup->getEavConfig()->getAttribute(Customer::ENTITY, 'job_title')
            ->addData([
                'attribute_set_id' => $attributeSetId,
                'attribute_group_id' => $attributeGroupId,
                'used_in_forms' => ['adminhtml_customer'],
            ]);

        $attribute->save();
    }
}
Here we are adding a job_title attribute that has been added to Magento’s default customer attribute set and attribute group.
Take note that there are three arguments when using addAttribute().
- The entity type ID. In this example, it is
customer. - The attribute code you’ll be using for your new attribute.
- An array of data to assign to your attribute.
Be sure to check the eav_attribute and customer_eav_attribute database tables to ensure that your attribute was added successfully.
Note that within the addData() method we also have a used_in_forms array key, whose values are the forms we can set our attribute to appear in.
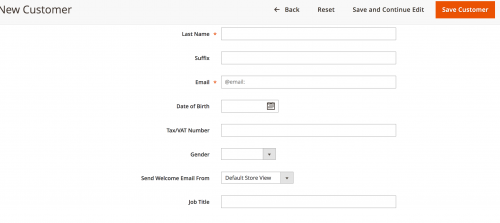
In the above example, we are using the adminhtml_customer form, which means that our attribute will appear when editing customer information in the admin.
If you used the above example, you can see that the Job Title attribute appears in the form.

To see a full list of form codes available to use for your attribute, check out the customer_form_attribute database table.
Be aware that on Community versions of Magento, some additional template changes may be required in order to display your attributes on the customer_account_create and the customer_account_edit forms.
Customer Address Attributes
Similar functionality is needed to add customer address attributes. Instead of using the customer entity type code, you’ll now need to use customer_address.
In addition, if you want to ad your attribute into the customer edit form in the admin, the form code you’ll be looking for is adminhtml_customer_address.
<?php
namespace [Vendor]\[Module]\Setup;

use Magento\Customer\Setup\CustomerSetupFactory;
use Magento\Eav\Model\Entity\Attribute\Set as AttributeSet;
use Magento\Eav\Model\Entity\Attribute\SetFactory as AttributeSetFactory;
use Magento\Framework\Setup\InstallDataInterface;
use Magento\Framework\Setup\ModuleContextInterface;
use Magento\Framework\Setup\ModuleDataSetupInterface;

class InstallData implements InstallDataInterface
{
    private $customerSetupFactory;

    private $attributeSetFactory;

    public function __construct(
        CustomerSetupFactory $customerSetupFactory,
        AttributeSetFactory $attributeSetFactory
    ) {
        $this->customerSetupFactory = $customerSetupFactory;
        $this->attributeSetFactory = $attributeSetFactory;
    }

    public function install(ModuleDataSetupInterface $setup, ModuleContextInterface $context)
    {

        $customerSetup = $this->customerSetupFactory->create(['setup' => $setup]);

        $customerEntity = $customerSetup->getEavConfig()->getEntityType('customer');
        $attributeSetId = $customerEntity->getDefaultAttributeSetId();

        /** @var $attributeSet AttributeSet */
        $attributeSet = $this->attributeSetFactory->create();
        $attributeGroupId = $attributeSet->getDefaultGroupId($attributeSetId);

        $customerSetup->addAttribute('customer_address', 'village', [
            'type' => 'varchar',
            'label' => 'Village',
            'input' => 'text',
            'required' => false,
            'visible' => true,
            'user_defined' => true,
            'sort_order' => 1000,
            'position' => 1000,
            'system' => 0,
        ]);

        $attribute = $customerSetup->getEavConfig()->getAttribute('customer_address', 'village')
            ->addData([
                'attribute_set_id' => $attributeSetId,
                'attribute_group_id' => $attributeGroupId,
                'used_in_forms' => ['adminhtml_customer_address'],
            ]);

        $attribute->save();
    }
}
When adding or editing a customer from within the admin, simply click on the Addresses tab to find your new address attribute.

Note: This article is based on Magento Open Source version 2.1.