Add System Configuration in Magento 2
Many Magento modules require the ability to have configuration settings within the admin area so that the merchant can edit them to suit their needs. This article will show you how to add System Configuration in Magento 2.
If you’re familiar with Magento 1.x versions, you could add custom configuration by creating a system.xml and adding the
// app/code/[codepool]/[Vendor]/[Module]/etc/system.xml
<?xml version="1.0"?>
<config>
    <tabs>
        <some_custom_tab translate="label">
            <label>Custom Tab!</label>
            <sort_order>0</sort_order>
        </some_custom_tab>
    </tabs>
    <sections>
        <some_custom_section translate="label">
            <label>Custom Section!</label>
            <sort_order>0</sort_order>
            <tab>some_custom_tab</tab>
            <show_in_default>1</show_in_default>
            <show_in_website>1</show_in_website>
            <show_in_store>1</show_in_store>
            <groups>
                <some_custom_group translate="label">
                    <label>Custom Group!</label>
                    <sort_order>0</sort_order>
                    <show_in_default>1</show_in_default>
                    <show_in_website>1</show_in_website>
                    <show_in_store>1</show_in_store>
                    <fields>
                        <some_custom_field translate="label">
                            <label>Custom Field!</label>
                            <frontend_type>text</frontend_type>
                            <sort_order>0</sort_order>
                            <show_in_default>1</show_in_default>
                            <show_in_website>1</show_in_website>
                            <show_in_store>1</show_in_store>
                            <comment>Hey, I'm the comment for the custom field.</comment>
                        </some_custom_field>
                    </fields>
                </some_custom_group>
            </groups>
        </some_custom_section>
    </sections>
</config>
This would render the following.

We could break down the XML into four different node groups.
- Tabs
- Sections
- Groups
- Fields
Magento 2 has similar syntax and uses the same node groups, so adding configuration into later versions of Magento isn’t too difficult.
Assuming that you have already created and enabled a custom module to add your configuration to, we can begin.
Firstly, create a system.xml within the /etc/adminhtml directory of your module. We’ll start with adding the tab configuration.
All system configuration belongs within a pair of <system> nodes that are within a pair of <config> nodes.
// app/code/[Vendor]/[Module]/etc/adminhtml/system.xml
<?xml version="1.0"?>
<config xmlns:xsi="http://www.w3.org/2001/XMLSchema-instance" xsi:noNamespaceSchemaLocation="urn:magento:module:Magento_Config:etc/system_file.xsd">
    <system>
        <tab id="custom_tab" translate="label" sortOrder="0">
            <label>Custom Tab!</label>
        </tab>
    </system>
</config>
The main difference you’ll notice is that rather than having sub-nodes within the <tabs> node, we have a <tab> node that contains its own attributes such as the ‘id’ and ‘sortOrder’. This is similar when adding the <section>, <group> and <field> nodes.
Next, add a section.
// app/code/[Vendor]/[Module]/etc/adminhtml/system.xml
<?xml version="1.0"?>
<config xmlns:xsi="http://www.w3.org/2001/XMLSchema-instance" xsi:noNamespaceSchemaLocation="urn:magento:module:Magento_Config:etc/system_file.xsd">
    <system>
        <tab id="custom_tab" translate="label" sortOrder="0">
            <label>Custom Tab!</label>
        </tab>
        <section id="custom_section" translate="label" type="text" sortOrder="0" showInDefault="1" showInWebsite="1" showInStore="1">
            <label>Custom Section!</label>
            <tab>custom_tab</tab>
            <resource>[Vendor]_[Module]::config</resource>
        </section>
    </system>
</config>
A new <resource> node is introduced, and the value needs to match the resource ID used in the ACL configuration.
Let’s add the ACL next to the acl.xml file
// app/code/[Vendor]/[Module]/etc/acl.xml
<?xml version="1.0"?>
<config xmlns:xsi="http://www.w3.org/2001/XMLSchema-instance" xsi:noNamespaceSchemaLocation="urn:magento:framework:Acl/etc/acl.xsd">
    <acl>
        <resources>
            <resource id="Magento_Backend::admin">
                <resource id="Magento_Backend::stores">
                    <resource id="Magento_Backend::stores_settings">
                        <resource id="Magento_Config::config">
                            <resource id="[Vendor]_[Module]::config" title="Custom Extension" sortOrder="50" />
                        </resource>
                    </resource>
                </resource>
            </resource>
        </resources>
    </acl>
</config>
Heading back to system.xml, add a group using a pair of <group> nodes.
// app/code/[Vendor]/[Module]/etc/adminhtml/system.xml
<?xml version="1.0"?>
<config xmlns:xsi="http://www.w3.org/2001/XMLSchema-instance" xsi:noNamespaceSchemaLocation="urn:magento:module:Magento_Config:etc/system_file.xsd">
    <system>
        <tab id="custom_tab" translate="label" sortOrder="0">
            <label>Custom Tab!</label>
        </tab>
        <section id="custom_section" translate="label" type="text" sortOrder="0" showInDefault="1" showInWebsite="1" showInStore="1">
            <label>Custom Section!</label>
            <tab>custom_tab</tab>
            <resource>[Vendor]_[Module]::config</resource>
            <group id="custom_group" translate="label" type="text" sortOrder="1" showInDefault="1" showInWebsite="1" showInStore="1">
                <label>Custom Group!</label>
            </group>
        </section>
    </system>
</config>
And finally, add some fields. Each field configuration belongs within its own <field> node.
// app/code/[Vendor]/[Module]/etc/adminhtml/system.xml
<?xml version="1.0"?>
<config xmlns:xsi="http://www.w3.org/2001/XMLSchema-instance" xsi:noNamespaceSchemaLocation="urn:magento:module:Magento_Config:etc/system_file.xsd">
<system>
<tab id="custom_tab" translate="label" sortOrder="0">
<label>Custom Tab!</label>
</tab>
<section id="custom_section" translate="label" type="text" sortOrder="0" showInDefault="1" showInWebsite="1" showInStore="1">
<label>Custom Section!</label>
<tab>custom_tab</tab>
<resource>[Vendor]_[Module]::config</resource>
<group id="custom_group" translate="label" type="text" sortOrder="1" showInDefault="1" showInWebsite="1" showInStore="1">
<label>Custom Group!</label>
<field id="enabled_config" translate="label" type="select" sortOrder="1" showInDefault="1" showInWebsite="1" showInStore="1">
<label>Enabled</label>
<source_model>Magento\Config\Model\Config\Source\Yesno</source_model>
</field>
<field id="text_config" translate="label" type="text" sortOrder="20" showInDefault="1" showInWebsite="1" showInStore="1">
<label>Text Configuration</label>
<comment>Add some text here</comment>
</field>
<field id="textarea_config" translate="label" type="textarea" sortOrder="50" showInDefault="1" showInWebsite="1" showInStore="1">
<label>Textarea Configuration</label>
</field>
<field id="image_config" translate="label" type="image" sortOrder="30" showInDefault="1" showInWebsite="1" showInStore="1">
<label>Image Configuration</label>
<backend_model>Magento\Config\Model\Config\Backend\Image</backend_model>
<upload_dir config="system/filesystem/media" scope_info="1">logo</upload_dir>
<base_url type="media" scope_info="1">logo</base_url>
</field>
</group>
</section>
</system>
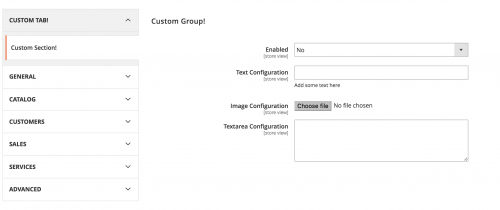
</config>The XML above has added the following fields:
- An ‘Enabled’ field containing a Yes/No dropdown using Magento’s Magento\Config\Model\Config\Source\Yesno class
- A text field
- A textarea
- An image field using Magento’s Magento\Config\Model\Config\Backend\Image class
If you’ve followed the steps correctly, you should be able to see something like the following.
Note that within Magento 2, there is no System -> Configuration path. Within Magento 2, you will need to head to Stores -> Configuration to see your changes.
Note: This article is based on Magento CE version 2.1.