Adding a Customer Attribute in Magento
This article will how to go about adding a customer attribute in Magento.
Similar to the catalog_product entity, Magento uses the EAV model to store customer information. There are two entities involved here: the customer entity and the customer_address entity. These entity types can be found in the eav_entity_type in the database.
The two main tables involved in saving customer and customer address information are the following.
- customer_entity
- customer_address_entity
We also have a customer_eav_attribute table and then the EAV tables themselves.
- customer_entity_datetime
- customer_entity_decimal
- customer_entity_int
- customer_entity_text
- customer_entity_varchar
- customer_address_entity_datetime
- customer_address_entity_decimal
- customer_address_entity_int
- customer_address_entity_text
- customer_address_entity_varchar
So if we want to add a customer attribute into the system, what steps do we need to take? There are a couple of ways that could be approached. One of them is by running an external script in the Magento root directory.
require_once dirname(__FILE__) . '/app/Mage.php';
Mage::app();

$setup= new Mage_Customer_Model_Resource_Setup();
$setup->addAttribute('customer','some_attribute_id',array(
    'group' => 'General',
    'type' => 'varchar',
    'input' => 'text',
    'label' => 'Some Attribute Label',
    'visible' => 1,
    'required' => 0,
    'visible_on_front' => 1,
    'sort_order' => 120
));
Or we could use a setup script within a custom module similar to the Adding a Category Attribute article.
To do this, add your own module declaration file.
<?xml version="1.0"?>
<config>
    <modules>
        <Custom_Customerattribute>
            <codePool>local</codePool>
            <active>true</active>
        </Custom_Customerattribute>
    </modules>
</config>
Then the module’s config.xml configuration file. Take note of the setup class used here within the pair of <class> nodes.
<?xml version="1.0"?>
<config>
    <modules>
        <Custom_Customerattribute>
            <version>1.0.0</version>
        </Custom_Customerattribute>
    </modules>
    <global>
        <resources>
            <custom_customerattribute_setup>
                <setup>
                    <module>Custom_Customerattribute</module>
                    <class>Mage_Customer_Model_Resource_Setup</class>
                </setup>
            </custom_customerattribute_setup>
        </resources>
    </global>
</config>
And finally, the install script.
<?php
$installer = $this;
$installer->startSetup();

$installer->addAttribute('customer', 'some_attribute_id', array(
    'type' => 'varchar',
    'input' => 'text',
    'label' => 'Some Attribute Label',
    'global' => 1,
    'visible' => 1,
    'required' => 0,
    'user_defined' => 1,
    'visible_on_front' => 1
);

$installer->endSetup();
The setup class used is Mage_Customer_Model_Resource_Setup, which extends the Mage_Eav_Model_Entity_Setup class.
The Mage_Eav_Model_Entity_Setup class contains the addAttribute() method.
Within the _prepareValues() method of the Mage_Customer_Model_Resource_Setup class, there are customer entity specific options that are needed during attribute creation.
protected function _prepareValues($attr)
{
    $data = parent::_prepareValues($attr);
    $data = array_merge($data, array(
        'is_visible'                => $this->_getValue($attr, 'visible', 1),
        'is_system'                 => $this->_getValue($attr, 'system', 1),
        'input_filter'              => $this->_getValue($attr, 'input_filter', null),
        'multiline_count'           => $this->_getValue($attr, 'multiline_count', 0),
        'validate_rules'            => $this->_getValue($attr, 'validate_rules', null),
        'data_model'                => $this->_getValue($attr, 'data', null),
        'sort_order'                => $this->_getValue($attr, 'position', 0)
    ));

    return $data;
}
After refreshing any page on your Magento website, you should see the attribute record added within the eav_attribute table.
You may notice that you are unable to see the attribute added anywhere within Magento even though it appears as a new row within the eav_attribute table. This is due to Magento having another table that decides what attributes should show in different forms within Magento.
If you view the customer_form_attribute table within the database, there are list of form_codes and attribute IDs assigned to these codes. The different form codes include the below list.
- checkout_register
- customer_account_create
- customer_account_edit
- customer_register_address
- customer_address_edit
- adminhtml_customer
- adminhtml_customer_address
- adminhtml_checkout
Within Magento Enterprise Edition in the admin area, you get a nice customer attributes interface where you can select the forms you’d like to include attributes in. Unfortunately, Community/Open Source versions of Magento do not have this luxury.
So, in order to get our attribute to show in forms, we need to load the Mage_Eav_Model_Config class and use the getAttribute() method. For example, if we wanted to show our attribute within the customer form in the admin area, we would need to use the adminhtml_customer form code.
Assuming you have removed any previous attribute codes from this article and removed the custom_customerattribute_setup resource from the core_resource database table, you can edit your install file and re-run the setup script.
<?php
$installer = $this;
$installer->startSetup();

$installer->addAttribute('customer', 'some_attribute_id', array(
    'type' => 'varchar',
    'input' => 'text',
    'label' => 'Some Attribute Label',
    'global' => 1,
    'visible' => 1,
    'required' => 0,
    'user_defined' => 1,
);

$eavConfig = Mage::getSingleton('eav/config');
    ->getAttribute('customer', 'some_attribute_id')
    ->setData('used_in_forms' array('adminhtml_customer'))
    ->save();

$installer->endSetup();
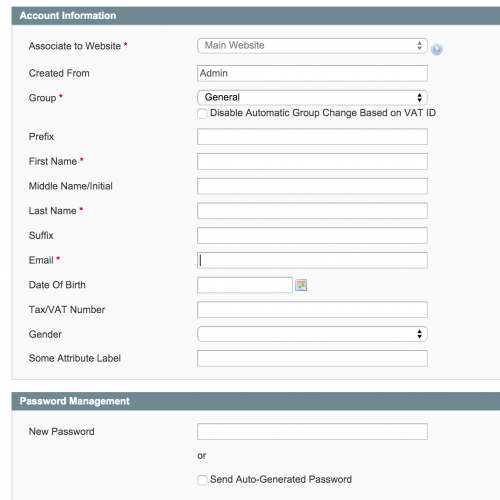
When heading into the Manage Customers section in the admin area under either the Add or Edit Customer pages, you should see your custom attribute.
Should you need to update the attribute already saved in your system, this can achieved by running an upgrade script. First, ensure that the value within the version nodes in config.xml is higher than the version saved in the core_resource database table.
<?xml version="1.0"?>
<config>
    <modules>
        <Custom_Customerattribute>
            <version>1.0.1</version>
        </Custom_Customerattribute>
    </modules>
    <global>
        <resources>
            <custom_customerattribute_setup>
                <setup>
                    <module>Custom_Customerattribute</module>
                    <class>Mage_Customer_Model_Resource_Setup</class>
                </setup>
            </custom_customerattribute_setup>
        </resources>
    </global>
</config>
Then add the upgrade script. For example, the below shows a change of the attribute label.
<?php
$installer = $this;

$installer->startSetup();

$installer->updateAttribute(
    'customer',
    'some_attribute_id',
    'frontend_label',
    'Some Other Attribute Label Name'
);

$installer->endSetup();
Remember the slight catch with updating attributes; the third argument passed in must match the column name within the database and not the alias name used.
So frontend_label will need to be used, whereas in the addAttribute() method, frontend_label or label could be used.
To remove an attribute from the system, the removeAttribute() method is used. To run this, we would need to set up an upgrade script similar to the above, except the script itself would contain the following contents.
<php
$installer = $this;

$installer->startSetup();

$installer->removeAttribute('customer','some_attribute_id');

$installer->endSetup();
Just two parameters are used in the removeAttribute() method: the entity type code and the attribute code.
Note: This article is based on Magento Community/Open Source version 1.9.