Authenticate a User in Swift
Here we take a look at how to authenticate a user in Swift using a MongoDB database connection. A basic example of this can be seen by creating a login screen within Xcode. Whilst the swift code within Xcode won’t contain any database connection details itself, the application will use URLs derived from a Node.js application, which in turns uses code to connect to the MongoDB database.
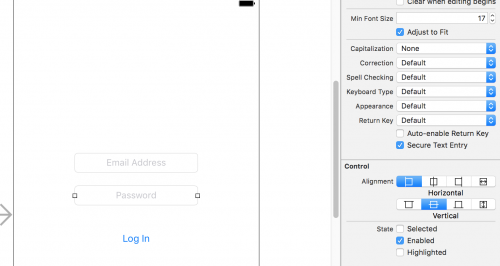
To show this in more details, we’ll start with a simple view from within Xcode that will show a login form. Using Xcode, drag a couple of text fields and a button onto Main.storyboard.
The two text fields will represent an email address and password input. When adding the password input, ensure that the Secure Text Entry checkbox is checked.
If you know how to add IBOutlets and IBActions in Xcode, these need to be added next.
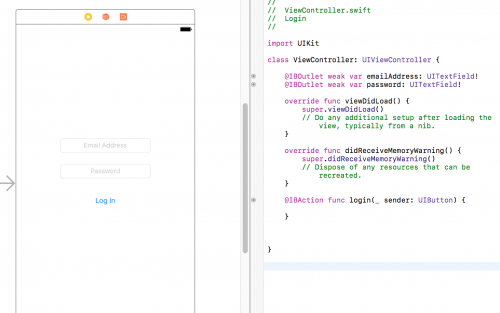
As the application will be accessing a URL from the Node.js application, we need to define the URL as a constant. In this example the Node.js application is running locally, therefore a localhost URL is being used.
class ViewController: UIViewController {

    let loginUrl = "http://localhost:3000/api/login"

    // Rest of the class code below

}
This URL belongs in Node.js, and the following code is executed when the URL is accessed.
var async = require('async');
var MongoClient = require('mongodb').MongoClient;

var userCollection;
MongoClient.connect('mongodb://<dbuser>:<dbpassword>@ds137540.mlab.com:37540/<dbname>', function (err, db) {
  if (!err) {
    console.log('MongoDB connected');
    userCollection = db.collection('users')
  } else {
    throw err
  }
});

app.post('/api/login', function(req, res) {
  async.waterfall([
    function (callback) {
      userCollection.findOne({
        "email_address": req.body.email
      }, function (err, result) {
        if (err) {
          console.log(err);
          res.status(500).send({error: "An error has occurred"});
        } else {
          if (result == null) {
            res.status(200).send({"error": "This email address is not recognised, please check you have entered your email correctly"});
          } else {
            console.log("Email recognised");
            callback(null, result);
          }
        }
      });
    },
    function (result, user){
      var password = result.password;
      if (req.body.password !== password){
        res.status(200).send({"error":"Sorry your password is incorrect"});
      } else {
        res.status(200).send({statusCode: 200, message: 'The user logged in successfully.'});
      }
    }
  ])
});
The code above firstly uses MongoDB’s findOne method to find an email address in a userCollection collection and match it against the email address provided within the form data. If an matching email address has been found, the code then checks for a matching password.
The users collection in MongoDB contains a unique ID, an email_address and a password field.
In order to compose a HTTP request in Swift, first instantiate a URLRequest and assign it to a variable, passing in the API URL as an argument.
@IBAction func login(_ sender: UIButton) {
    let loginVal = self.emailAddress.text!
    let passwordVal = self.password.text!

    var request = URLRequest(url: URL(string: loginUrl)!)
    request.httpMethod = "POST"

    let postString = "email=" + loginVal + "&password=" + passwordVal
    request.httpBody = postString.data(using: .utf8)
}
By default in Xcode 10, non secure HTTP requests will be blocked, and therefore a domain exception will need to be added into your project’s settings.
This can be done within your Project Navigator, locate the info.plist file and right click it. Then choose Open As and select source code.
Paste in the following XML to allow the application to make non secure HTTP requests to localhost.
// info.plist
<key>NSAppTransportSecurity</key>
<dict>
    <key>NSExceptionDomains</key>
    <dict>
        <key>localhost</key>
        <dict>
            <key>NSIncludesSubdomains</key>
            <true/>
            <key>NSTemporaryExceptionAllowsInsecureHTTPLoads</key>
            <true/>
            <key>NSTemporaryExceptionMinimumTLSVersion</key>
            <string>TLSv1.1</string>
        </dict>
    </dict>
</dict>
Heading back to the Swift HTTP request code, the code below will sent the HTTP request and return the response.
let task = URLSession.shared.dataTask(with: request) { data, response, error in
    guard let data = data, error == nil else {
        // check for fundamental networking error
        print("error=\(error)")
        return
    }

    if let httpStatus = response as? HTTPURLResponse, httpStatus.statusCode != 200 {
        // check for http errors
        print("statusCode should be 200, but is \(httpStatus.statusCode)")
        print("response = \(response)")
    }

    let responseString = String(data: data, encoding: .utf8)
    print("responseString = \(responseString)")
}
task.resume()
The full login function is therefore as follows.
@IBAction func login(_ sender: UIButton) {
    let loginVal = self.emailAddress.text!
    let passwordVal = self.password.text!

    var request = URLRequest(url: URL(string: loginUrl)!)
    request.httpMethod = "POST"
    let postString = "email=" + loginVal + "&password=" + passwordVal
    request.httpBody = postString.data(using: .utf8)

    let task = URLSession.shared.dataTask(with: request) { data, response, error in
        guard let data = data, error == nil else {
            // check for fundamental networking error
            print("error=\(error)")
            return
        }

        if let httpStatus = response as? HTTPURLResponse, httpStatus.statusCode != 200 {
            // check for http errors
            print("statusCode should be 200, but is \(httpStatus.statusCode)")
            print("response = \(response)")
        }

        let responseString = String(data: data, encoding: .utf8)
        print("responseString = \(responseString)")
    }
    task.resume()
}
When running the application, after testing the following scenarios:
– Submitting the form with an unrecognised email address.
– Submitting the form with a recognised email address and an incorrect password.
– Successfully submitting a recognised email address and correct password.
The following data is logged to Xcode’s debug output.
responseString = Optional("{\"error\":\"This email address is not recognised, please check you have entered your email correctly\"}")

responseString = Optional("{\"error\":\"Sorry your password is incorrect\"}")

responseString = Optional("{\"statusCode\":200,\"message\":\"The user logged in successfully.\"}")
You can then handle the responses as you choose. The messages come from the Node.js application, and so you can change these messages within that application rather than changing them within Swift (and therefore having to push up a new app version to the app store).