Creating a Magento 2 Module
This article will show you the steps needed for creating a Magento 2 module. This module will output some content onto the frontend of the website.
When building a module, it is a good idea to put your application into developer mode. This can be done using one of the commands Magento gives you.
$ /path/to/your/php bin/magento deploy:mode:set developerThis changes the MAGE_MODE value in the config array within the app/etc/env.php file.
So to start with, register a custom module that will hold the module updates.
Create a module.xml file.
// app/code/Siphor/Custom/etc/module.xml
<?xml version="1.0"?>
<config xmlns:xsi="http://www.w3.org/2001/XMLSchema-instance" xsi:noNamespaceSchemaLocation="urn:magento:framework:Module/etc/module.xsd">
    <module name="Siphor_Custom" setup_version="1.0.0" />
</config>
Then add the module’s registration.php file.
// app/code/Siphor/Custom/registration.php
<?php
\Magento\Framework\Component\ComponentRegistrar::register(
    \Magento\Framework\Component\ComponentRegistrar::MODULE,
    'Siphor_Custom',
    __DIR__
);
Then, run the following commands to enable your module.
$ /path/to/your/php bin/magento module:enable --clear-static-content Siphor_Custom
$ /path/to/your/php bin/magento setup:upgrade
First of all, let’s add a controller that will have a front name where we’ll be able to access the module via a URL.
In order to this, we first need to add configuration to a routes.xml file that will need to be created within the module strcture.
// app/code/Siphor/Custom/etc/frontend/routes.xml
<?xml version="1.0"?>
<config xmlns:xsi="http://www.w3.org/2001/XMLSchema-instance" xsi:noNamespaceSchemaLocation="../../../../../../lib/internal/Magento/Framework/App/etc/routes.xsd">
    <router id="standard">
        <route id="custom" frontName="custom">
            <module name="Siphor_Custom" />
        </route>
    </router>
</config>
The ‘frontName’ attribute of the <route> node will be the front name i.e. the first part of the URL after the first “/”.
Now add the controller class. The controller class’ name will match the ‘action’ part of the URL and will reside within a ‘Index’ directory within the module’s ‘Controller’ directory.
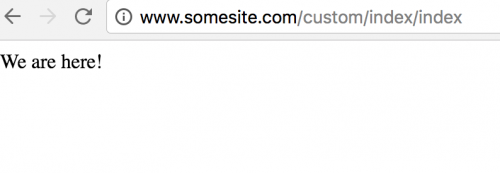
This means that we’ll be able to access our module by heading to the following URL:
http://www.somesite.com/custom/index/indexEach controller action class should have an execute() method.
// app/code/Siphor/Custom/Controller/Index/Index.php
<?php
namespace Siphor\Custom\Controller\Index;

class Index extends \Magento\Framework\App\Action\Action
{
    public function execute()
    {
        echo 'We are here!';
        exit();
    }
}
Note that the class extends the \Magento\Framework\App\Action\Action class. This is needed when adding frontend controllers.
Head to the specified URL and you should see the ‘We are here!’ text that will let you know you’ve added the controller correctly.
As we want to replace this text with some actual content, edit the class file to match the below.
// app/code/Siphor/Custom/Controller/Index/Index.php
<?php
namespace Siphor\Custom\Controller\Index;

class Index extends \Magento\Framework\App\Action\Action
{
    protected $_resultPageFactory;

    public function __construct(\Magento\Framework\App\Action\Context $context,
        \Magento\Framework\View\Result\PageFactory $resultPageFactory)
    {
        $this->_resultPageFactory = $resultPageFactory;
        parent::__construct($context);
    }

    public function execute()
    {
        $resultPage = $this->_resultPageFactory->create();
        return $resultPage;
    }
}
After clearing the contents from var/cache and var/generation and refreshing the page, you may notice that you are presented with a white page.
Not to worry, as we now need to add some layout configuration in order for the page to display correctly.
Within Magento 1, one of the layout handles generated per page was obtained using the front name of a module (e.g catalog), the controller name (e.g ‘Product’Controller.php) and the action method (e.g ‘view’Action()).
So one of the layout handles for the product page would look like the following:
catalog_product_viewWithin the layout XML files, you could then specify layout updates specific to that layout handle.
Within Magento 2 there is something similar going on, except instead of placing a layout handle within a layout configuration file, the file name is made up of the layout handle.
Therefore we need to create a ‘custom_index_index.xml’ file.
// app/code/Siphor/Custom/view/frontend/layout/custom_index_index.xml
<?xml version="1.0"?>
<page layout="1column" xmlns:xsi="http://www.w3.org/2001/XMLSchema-instance" xsi:noNamespaceSchemaLocation="urn:magento:framework:View/Layout/etc/page_configuration.xsd">
    <body>
        <referenceContainer name="content">
            <block class="Siphor\Custom\Block\Template" name="siphor.custom.template" as="custom_template"
                template="Siphor_Custom::template.phtml" />
        </referenceContainer>
    </body>
</page>
The <page> node must have a ‘layout’ attribute that specifies the page layout to be used when the page is loaded.
The block class, Siphor\Custom\Block\Template, is a custom block class used which is the next class to create.
The block classes in Magento belong in a ‘Block’ folder within your module structure. We’ll create a block called Template.php.
The block classes should extend the Magento\Framework\View\Element\Template class.
As an example, the getWelcomeText() method will simply return a string.
// app/code/Siphor/Custom/Block/Template.php
<?php
namespace Siphor\Custom\Block;

use Magento\Framework\View\Element\Template as MagentoTemplate;

class Template extends MagentoTemplate
{
    public function getWelcomeText()
    {
        return __('Welcome to your new page!');
    }
}
Referring back to the layout, we specified in the <block> node that the ‘template’ attribute value used will be a template.phtml file. This file should be created next.
// app/code/Siphor/Custom/view/frontend/templates/template.phtml
<div class="container">
<?php echo $this->getWelcomeText(); ?>
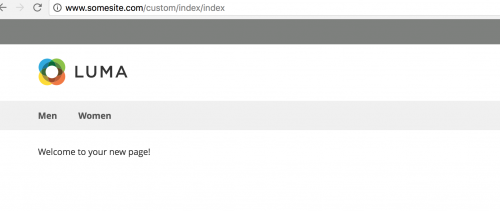
</div>Refresh your page again and you should notice the welcome text appear.
We can access Magento factory classes within our block class by overriding the constructor in the block class and adding the class factory as a dependency.
So if we wanted use Magento’s logging class, we could amend our Template.php block class to look like the below.
// app/code/Siphor/Custom/Block/Template.php
<?php
namespace Siphor\Custom\Block;

use Magento\Framework\View\Element\Template as MagentoTemplate;

class Template extends MagentoTemplate
{
    protected $_logger;

    public function __construct(
        \Magento\Backend\Block\Template\Context $context,
        \Psr\Log\LoggerInterface $logger,
        array $data = []
    )
    {
        $this->_logger = $logger;
        parent::__construct($context, $data);
    }


    public function getWelcomeText()
    {
        $this->logSomeData();
        return __('Welcome to your new page!');
    }

    public function logSomeData()
    {
        $this->_logger->debug("Hey! We've logged some information.");
    }

}
If added correctly, the debug.log file within the var/log directory should be populated with our debug message.
// var/log/debug.log
[2016-10-25 20:07:21] main.DEBUG: Hey! We've logged some information. {"is_exception":false} []
Note: This article is based on Magento CE version 2.1.