Creating a Magento 2 Block
Similar to Magento 1, a fundamental task for developers within the newer versions of Magento is learning about creating a Magento 2 block.
The block classes will contain functionality that can be passed to Magento’s theme template files that can be shown on the storefront.
To add your own block, as always, is to register a custom module that will hold your customisations.
Start by creating a module.xml file.
// app/code/Siphor/Custom/etc/module.xml

<?xml version="1.0"?>
<config xmlns:xsi="http://www.w3.org/2001/XMLSchema-instance" xsi:noNamespaceSchemaLocation="urn:magento:framework:Module/etc/module.xsd">
    <module name="Siphor_Custom" setup_version="1.0.0" />
</config>
Then add the module’s registration.php file.
// app/code/Siphor/Custom/registration.php

<?php
\Magento\Framework\Component\ComponentRegistrar::register(
    \Magento\Framework\Component\ComponentRegistrar::MODULE,
    'Siphor_Custom',
    __DIR__
);
Then, run the following commands to enable your module and run the database upgrade.
$ /path/to/your/php bin/magento module:enable --clear-static-content Siphor_Custom
$ /path/to/your/php bin/magento setup:upgrade
For simplicity, this module will simply contain a block that will echo out a notice within the page header of the website.
The block classes belong in a Block directory within your module structure. Within this directory, a Notice.php class will be defined.
Any block classes created by default should extend the Magento\Framework\View\Element\Template class.
As an example, a getNoticeText() method will be created. This will simply return a string regarding information about a free shipping promotion on the storefront.
// app/code/Siphor/Custom/Block/Notice.php

<?php
namespace Siphor\Custom\Block;

use Magento\Framework\View\Element\Template;

class Notice extends Template
{
    public function getNoticeText()
    {
        return __('Free shipping for orders over £50!');
    }
}
Note the translate function used here is simply the global function __() rather than the $this->__() methods used in Magento 1.
Create the following directories within your module’s directory structure. The directories should be within the following location.
app/code/Siphor/Custom/view/frontend/layout
app/code/Siphor/Custom/view/frontend/templates
As we want the notice to appear on all pages, the default.xml layout file should be created.
This file will contain the following layout updates.
// app/code/Siphor/Custom/view/frontend/layout/default.xml

<?xml version="1.0"?>
<page xmlns:xsi="http://www.w3.org/2001/XMLSchema-instance" xsi:noNamespaceSchemaLocation="urn:magento:framework:View/Layout/etc/page_configuration.xsd">
    <body>
        <referenceContainer name="page.top">
            <block class="Siphor\Custom\Block\Notice" name="siphor.custom.notice" as="custom_notice"
                   after="catalog.topnav" template="Siphor_Custom::notice.phtml" />
        </referenceContainer>
    </body>
</page>
As page.top is a referenceContainer rather than a referenceBlock, which is Magento 1’s equivalent of the core/text_list block type, we don’t need to use the getChildHtml() method to ensure that our block gets rendered.
If however, we were referencing a referenceBlock, we would need to use the getChildHtml() within the template file of the referenceBlock.
The notice page template will contain some simple HTML that will use the getNoticeText() method as defined in our block class.
// app/code/Siphor/Custom/view/frontend/templates/notice.phtml
<div class="header-notice">
<?php echo $this->getNoticeText(); ?>
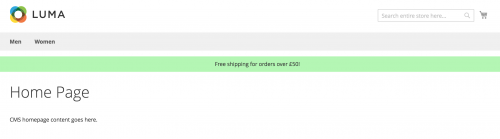
</div>Run the Magento commands to regenerate the cache and static files, and with some CSS applied to the template, you should see the notice on the frontend.
Note: This article is based on Magento CE version 2.1.