Integrate PayPal Express Checkout
Using PayPal Express on your website helps keep the user engaged with your web pages throughout the payment process. When you integrate PayPal Express Checkout on your webpage, a secure window overlays the page allowing users to complete their purchase. For mobile and tablet devices, the user is directed to a full screen PayPal payment page.
If you need to integrate PayPal Express Checkout on your website using the Client-side REST integration option, you will first need to include the checkout.js JavaScript file provided by PayPal in your site’s <head>.
<!DOCTYPE html>
<html>
<head>
    <script type="text/javascript" src="https://www.paypalobjects.com/api/checkout.js"></script>
</head>
<body>
</body>
</html>
To implement a PayPal Checkout button on your website, add some simple HTML markup in the form of a <div> element.
<!DOCTYPE html>
<html>
<head>
    <script type="text/javascript" src="https://www.paypalobjects.com/api/checkout.js"></script>
</head>
<body>
    <div id="paypal-button"></div>
</body>
</html>
When including the checkout.js file, you can use paypal.Button.render(), passing in two parameters.
The first argument defines PayPal configuration, such as the look of the PayPal button, what happens when customers make a payment and what should happen if an error occurs.
The second argument will contain the element of the PayPal button that’s been defined in your HTML.
<!DOCTYPE html>
<html>
<head>
    <script type="text/javascript" src="https://www.paypalobjects.com/api/checkout.js"></script>
</head>
<body>
    <div id="paypal-button"></div>
     <script>
    paypal.Button.render({
      env: 'production', // Or 'sandbox',

      commit: true, // Show a 'Pay Now' button

      style: {
        color: 'gold',
        size: 'small'
      },

      payment: function(data, actions) {
        /*
         * Set up the payment here
         */
      },

      onAuthorize: function(data, actions) {
        /*
         * Execute the payment here
         */
      },

      onCancel: function(data, actions) {
        /*
         * Buyer cancelled the payment
         */
      },

      onError: function(err) {
        /*
         * An error occurred during the transaction
         */
      }
    }, '#paypal-button');
  </script>
</body>
</html>
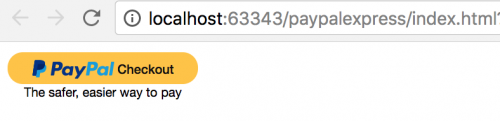
If you have the markup similar to the HTML document above, you’ll notice that a PayPal payment button now renders on the page.
In order to use the Client-side REST integration option, you need a client ID.
This will be available within your PayPal account. If you’re looking to test payments in Sandbox mode, log into your account at https://developer.paypal.com.
Next, head to the Dashboard section, click on My Apps & Credentials and scroll down to the REST API Apps section.
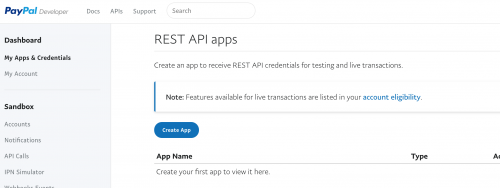
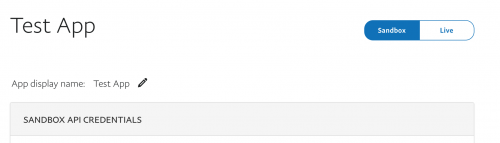
Click on Create App and give your app a name. After you’ve done this, you’ll be given a Client ID for both Sandbox and Production environments.
Add the Client IDs into the code within a client property.
<!DOCTYPE html>
<html>
<head>
    <script type="text/javascript" src="https://www.paypalobjects.com/api/checkout.js"></script>
</head>
<body>
    <div id="paypal-button"></div>
    <script>
    paypal.Button.render({
      env: 'production', // Or 'sandbox',

      commit: true, // Show a 'Pay Now' button

      style: {
        color: 'gold',
        size: 'small'
      },

      client: {
         sandbox:    'xxxxxxxxx',
         production: 'xxxxxxxxx'
      },

      payment: function(data, actions) {
        /*
         * Set up the payment here
         */
      },

      onAuthorize: function(data, actions) {
        /*
         * Execute the payment here
         */
      },

      onCancel: function(data, actions) {
        /*
         * Buyer cancelled the payment
         */
      },

      onError: function(err) {
        /*
         * An error occurred during the transaction
         */
      }
    }, '#paypal-button');
  </script>
</body>
</html>
Lastly, modify the payment function in the code to make a call to the REST API to create a payment, passing in the amount and the currency code.
payment: function(data, actions) {
  return actions.payment.create({
    payment: {
      transactions: [
        {
          amount: { total: '10.00', currency: 'GBP' }
        }
      ]
    }
  });
}
Now you should be able to successfully test transations using PayPal Express. Don’t forget to modify the onAuthorize, onCancel and onError functions to provide users with useful messages regarding their transactions.