Magento 2 with Cloudflare Cache
With many websites using Cloudflare as a reverse proxy, users take advantage of the caching tools that Cloudflare comes with. Sites using Magento 2 with Cloudflare cache often find the need to clear Magento’s cache and Cloudflare’s cache at the same time without having to clear the caches in two different places.
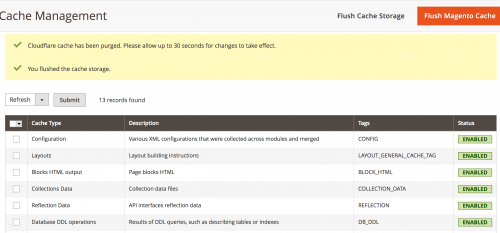
Looking below will describe and demonstrate the steps required to clear the Cloudflare cache at the same time when clicking on the Flush Cache Storage button in Magento 2’s admin under System -> Cache Management.
This is the preferred button to use to flush the Cloudflare cache as Cloudflare cache is considered ‘additional data’ and therefore not part of Magento’s cache.
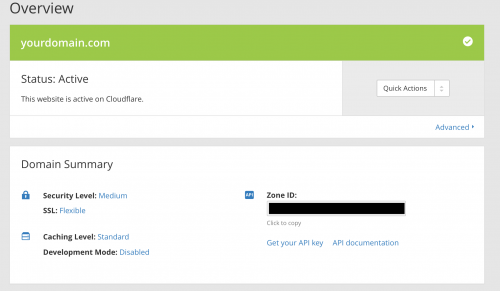
It is assumed that your Magento 2 website is already setup to use Cloudflare, and that you have generated an API Key within Cloudflare, as well as obtaining your Zone ID found on the Overview tab of your site’s settings in Cloudflare.

You’ll also need your email address associated to your Cloudflare account to hand, as this information is needed as well in order to make an API call to Cloudflare to flush the cache.
Firstly, define and register a custom module that will be responsible for connecting your store on Magento 2 with Cloudflare cache.
Add the module’s registration.php and module.xml files.
<?php
\Magento\Framework\Component\ComponentRegistrar::register(
    \Magento\Framework\Component\ComponentRegistrar::MODULE,
    '[Vendor]_[Module]',
    __DIR__
);
<?xml version="1.0"?>
<config xmlns:xsi="http://www.w3.org/2001/XMLSchema-instance" xsi:noNamespaceSchemaLocation="urn:magento:framework:Module/etc/module.xsd">
    <module name="[Vendor]_[Module]" setup_version="1.0.0" />
</config>
Now run the commands below to enable the module and run the database upgrade from your Magento project’s root directory.
$ /path/to/your/php bin/magento module:enable [Vendor]_[Module]
$ /path/to/your/php bin/magento setup:upgrade
In order to flush the website’s Cloudflare cache, an observer needs to be added that runs code to flush the cache when the Flush Cache Storage button is clicked in the Magento admin.
There is an event in Magento that can be observed: adminhtml_cache_flush_all.
Add an events.xml file within the module’s etc/adminhtml directory to define the observer.
<?xml version="1.0"?>
<config xmlns:xsi="http://www.w3.org/2001/XMLSchema-instance" xsi:noNamespaceSchemaLocation="urn:magento:framework:Event/etc/events.xsd">
    <event name="adminhtml_cache_flush_all">
        <observer name="[module]_purge_cloudflare_cache" instance="[Vendor]\[Module]\Observer\PurgeCloudflareCache" />
    </event>
</config>
Now add the Observer file. The file will be responsible for building the API request to purge the website’s Cloudflare cache.
<?php
namespace [Vendor]\[Module]\Observer;

use Magento\Framework\App\Config\ScopeConfigInterface;
use Magento\Framework\Encryption\EncryptorInterface;
use Magento\Framework\Event\ObserverInterface;
use Magento\Framework\Message\ManagerInterface;
use Psr\Log\LoggerInterface;

class PurgeCloudflareCache implements ObserverInterface
{

    /**
     * Cloudflare API URL
     */
    const CFCACHE_API_URL = 'https://api.cloudflare.com/client/v4/zones/%s/purge_cache/';

    /**
     * @var ManagerInterface
     */
    public $messageManager;

    /**
     * @var LoggerInterface
     */
    public $logger;

    /**
     * PurgeCloudflareCache constructor.
     *
     * @param ManagerInterface $messageManager
     * @param LoggerInterface $logger
     */
    public function __construct(
        ManagerInterface $messageManager,
        LoggerInterface $logger
    ) {
        $this->messageManager = $messageManager;
        $this->logger         = $logger;
    }

    public function execute(\Magento\Framework\Event\Observer $observer)
    {
        $request = $this->getRequest();
        try {
            $response = $this->sendPurgeRequest($request);
            if ($response) {
                $decodedResponse = json_decode($response, true);
                if (isset($decodedResponse['success']) && $decodedResponse['success'] === true) {
                    $this->messageManager->addSuccessMessage(
                        'Cloudflare cache has been purged.
                        Please allow up to 30 seconds for changes to take effect.'
                    );
                } else {
                    $this->logger->error(
                        'Cloudflare error: ' .
                        $response
                    );
                    $this->messageManager->addErrorMessage(
                        'Cloudflare cache purge request failed. Please check Magento\'s log
                        files for more information.'
                    );
                }
            }
        } catch (\Exception $e) {
            $this->messageManager->addErrorMessage(
                'Magento encountered an unexpected problem. Please check Magento\'s log
                files for more information.'
            );
            $this->logger->critical($e->getMessage());
        }
    }

    private function getRequest()
    {
        $zoneId = 'YOUR SITE ZONE ID HERE';
        return sprintf(self::CFCACHE_API_URL, $zoneId);
    }

    private function sendPurgeRequest($request)
    {
        $email = 'YOUR EMAIL ADDRESS ASSOCIATED TO YOUR CLOUDFLARE ACCOUNT';
        $apiKey = 'YOUR API KEY';
        $headers = [];
        if ($email !== '' && $apiKey !== '') {
            $headers = [
                "X-Auth-Email: {$email}",
                "X-Auth-Key: {$apiKey}",
                "Content-Type: application/json"
            ];
        }
        $curl_opt_array = [
            CURLOPT_URL => $request,
            CURLOPT_RETURNTRANSFER => true,
            CURLOPT_FOLLOWLOCATION => true,
            CURLOPT_CONNECTTIMEOUT => 10,
            CURLOPT_TIMEOUT => 10,
            CURLOPT_VERBOSE => 0,
            CURLOPT_SSL_VERIFYHOST => 0,
            CURLOPT_SSL_VERIFYPEER => 0,
            CURLOPT_HTTPHEADER => $headers,
            CURLOPT_POSTFIELDS => '{"purge_everything":true}',
            CURLOPT_CUSTOMREQUEST => 'DELETE'
        ];
        $ch = curl_init();
        curl_setopt_array($ch, $curl_opt_array);
        $response = curl_exec($ch);
        return $response;
    }
}
Fill in the $zoneId, $email and $apiKey variable with your own Site Zone ID, Email Address and API Key details from your Cloudflare account, and the code above will create the API request needed to purge the Cloudflare cache.
Followed the steps and entered in your Cloudflare details correctly? When heading to System -> Cache Management in Magento, and clicking Flush Cache Storage, you should see an additional message suggesting that the Cloudflare cache has been cleared.

Now you have a working example of Magento 2 with Cloudflare cache. It is common for the $zoneId, $email and $apiKey variable values to be retrieved from Magento’s system configuration rather than hardcoding the values in the Observer file. It is recommended that you therefore add a system.xml file to your module so that your Cloudflare details can easily be added and/or amended in the admin.
Note: This article is based on Magento Open Source version 2.2.