Magento Add Cron Job
This article will assume that you have already set up the cron.sh or cron.php file on your server’s crontab and is successfully running.
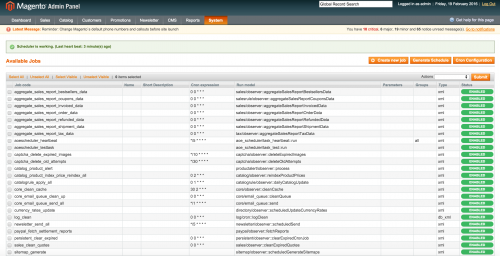
By default Magento has a list of cron jobs that execute at certain frequencies. Examples would be Magento’s Google sitemap generation, or cleaning up log files. If you haven’t done so, it is worth installing the free AOE Scheduler extension, as this gives you an area in the admin where you can visually see the cron jobs configured and a timeline of when they are scheduled to run, as well as if they have successfully run or not. The screenshot below shows the Job Configuration page of the AOE Scheduler and the cron jobs listed.
To start with, we should add our own custom module and add our module’s declaration file.
<?xml version="1.0"?>
<config>
    <modules>
        <Custom_Cron>
            <codePool>local</codePool>
            <active>true</active>
        </Custom_Cron>
    </modules>
</config>
We then need to create our module’s config.xml and define the cron configuration within this.
<?xml version="1.0"?>
<config>
    <global>
        <models>
            <custom_cron>
                <class>Custom_Cron_Model</class>
            </custom_cron>
        </models>
    </global>
    <crontab>
        <jobs>
            <custom_cron>
                <schedule>
                    <cron_expr>*/5 * * * *</cron_expr>
                <schedule>
                <run>
                    <model>custom_cron/observer::someCronMethod</model>
                </run>
            </custom_cron>
        </jobs>
    </crontab>
</config>
First, we have defined the model within the pair of models nodes within the pair of global nodes. Our model that we will create will contain the code that we want to run.
Our custom cron job belongs within the pair of jobs nodes within the pair of crontab nodes. The custom_cron is just a unique alias we have given to our cron job.
The value within the cron_expr nodes represents the frequency that our scheduled task should run. Currently, the value is set at every 5 minutes (*/5), every hour (*), every day (*), every week (*) and every month (*).
The value within the model nodes is formed of two parts; the first part before the “/” is from the same name as the alias given when declaring the custom model, under the pair of models nodes. The second part after the “/” is the name and the path of your model file found under the Model directory that will execute the code. Note that if our model file was located in Model/Directory/Observer.php, then the value within the method nodes would be custom_cron/directory_observer. After the :: we then specify the method that will be used within our model file to execute some code.
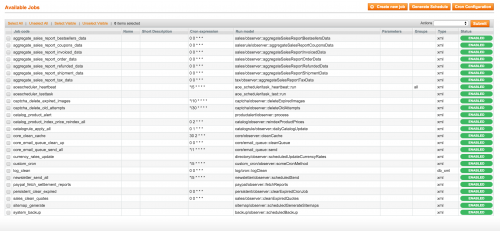
If we save the contents of our config.xml so far and refresh the Job Configuration page in the admin, we can see that our custom cron job has been added.
We haven’t created the model file as of yet, so let’s do this now.
<?php
class Custom_Cron_Model_Observer {
    public function someCronMethod() {
        Mage::log("This works", null, "Cron.log", true);
    }
}
Here we are simply logging the string This works to a Cron.log file found within the var/log directory. So every 5 minutes when this cron job is scheduled to run we should see this log file populate with the This works string.
When the log file gets populated and therefore you can confirm that your cron job is working correctly, you can replace the logging line with actual code that you would like to execute.
Note: This article is based on Magento Community/Open Source version 1.9.