Magento Adding Custom CSS and JS
It is common practice when creating a custom theme in Magento to add an additional stylesheet or JavaScript file that contains custom functionality.
Whilst it is not common practice to edit Magento’s existing layout files to achieve this, you can add layout updates to the theme’s local.xml layout file. This file might not exist by default, so if it doesn’t, create one within your theme’s layout directory.
The below example demonstrates how to add a custom CSS file.
<?xml version="1.0"?>
<layout>
    <default>
        <reference name="head">
            <action method="addCss">
                <stylesheet>css/somefolder/custom.css</stylesheet>
            </action>
        </reference>
    </default>
</layout>
This will add the custom.css file into the directory skin/frontend/[your_package]/[your_theme]/css/somefolder.
Note that this stylesheet has been added under a pair of default layout handles. This means that the stylesheet will be included on every page of Magento. If we wanted to include the stylesheet on just a specific page, the checkout page for example, we could write the following code.
<?xml version="1.0"?>
<layout>
    <checkout_onepage_index>
        <reference name="head">
            <action method="addCss">
                <stylesheet>css/somefolder/custom.css</stylesheet>
            </action>
        </reference>
    </checkout_onepage_index>
</layout>
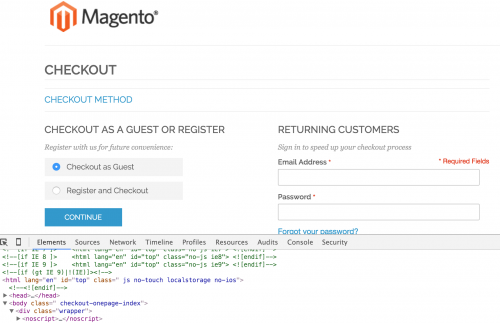
To find out the layout handle for a particular page, you can use your browser’s developer tools, and inspect over the <body> element. See the image below as an example.

Simply replace the hyphens with underscores to get the layout handle.
Another way of adding a stylesheet is using the addItem() method, passing in the skin_css type.
<?xml version="1.0"?>
<layout>
    <default>
        <reference name="head">
            <action method="addItem">
                <type>skin_css</type>
                <name>css/somefolder/custom.css</name>
            </action>
        </reference>
    </default>
</layout>
In addition to the addItem() method, you can also pass in additional nodes, such as the params node, passing in media="print" if you want to make your stylesheet print only. Other examples include passing in if nodes you want your stylesheet to be available in early versions of Internet Explorer.
/[your_theme]/layout/local.xml"]
<?xml version="1.0"?>
<layout>
    <default>
        <reference name="head">
            <action method="addItem">
                <type>skin_css</type>
                <name>css/somefolder/custom.css</name>
                <params>media="print"</params>
                <if>lt IE 8</if>
            </action>
        </reference>
    </default>
</layout>
As well as an addCss() method for adding stylesheets, there is an addJs() method for adding JavaScript. This method will add JavaScript into the js directory within the Magento root.
<?xml version="1.0"?>
<layout>
    <default>
        <reference name="head">
            <action method="addJs">
                <script>js/somefolder/custom.js</script>
            </action>
        </reference>
    </default>
</layout>
We can also make use of the addItem() method for adding JavaScript by passing in the skin_js type. This will place added scripts within your theme’s skin directory.
<?xml version="1.0"?>
<layout>
    <default>
        <reference name="head">
            <action method="addItem">
                <type>skin_js</type>
                <name>js/somefolder/custom.js</name>
            </action>
        </reference>
    </default>
</layout>
Note: This article is based on Magento Community/Open Source version 1.9.