Magento Create Widget
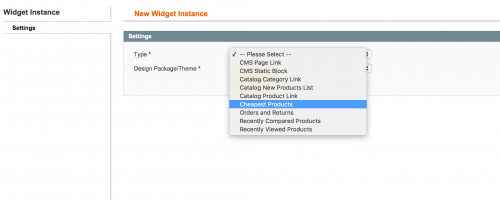
Widgets are found within the admin when you first go to add a widget instance under CMS -> Widgets. The default widget types for Magento Community/Open Source Edition can be seen below.
- CMS Page Link
- CMS Static Block
- Catalog Category Link
- Catalog New Products List
- Catalog Product Link
- Orders and Returns
- Recently Compared Products
- Recently Viewed Products
The main widget model in Magento is the Mage_Widget_Model_Widget class. There are some useful methods to look at, including getXmlConfig().
public function getXmlConfig()
{
    $cachedXml = Mage::app()->loadCache('widget_config');
    if ($cachedXml) {
        $xmlConfig = new Varien_Simplexml_Config($cachedXml);
    } else {
        $config = new Varien_Simplexml_Config();
        $config->loadString('<?xml version="1.0"?><widgets></widgets>');
        Mage::getConfig()->loadModulesConfiguration('widget.xml', $config);
        $xmlConfig = $config;
        if (Mage::app()->useCache('config')) {
            Mage::app()->saveCache($config->getXmlString(), 'widget_config',
                array(Mage_Core_Model_Config::CACHE_TAG));
        }
    }
    return $xmlConfig;
}
The getXmlConfig() method loads the widget config from the cache, or reads the contents of the widget configuration in the widget.xml files.
Magento, like with most things, gives us the ability to add a custom widget. This can be done by creating a new custom module.
First, we should add our module’s declaration file.
<?xml version="1.0"?>
<config>
    <modules>
        <Namespace_Customwidget>
            <codePool>local</codePool>
            <active>true</active>
        </Namespace_Customwidget>
    </modules>
</config>
A widget.xml file should then be created that will define our new widget. For this post, the widget will get the top 5 lowest priced products on the website.
<?xml version="1.0"?>
<widgets>
<customwidget_lowestproducts type="customwidget/lowestproducts" translate="label description" module="customwidget">
<name>Cheapest Product</name>
<description>Displays the cheapest products on the website</description>
</customwidget_lowestproducts>
</widgets>
All widget configuration belongs in a pair of widget nodes.
The customwidget_lowestproducts node is just a unique alias used to describe your new widget. The type attribute is used to define your block type that will assist you in displaying your widget.
The name and description nodes will be used when selecting your widget from inside the admin.
If we save what we have so far and head to the CMS -> Widgets -> Add New Widget Instance area, our widget option should be available to choose.
Currently there isn’t any functionality to bring back our product collection, so this will need to added. The block should be added next.
<?xml version="1.0"?>
<config>
    <global>
        <blocks>
            <customwidget>
                <class>Namespace_Customwidget_Block</class>
            </customwidget>
        </blocks>
    </global>
</config>
<?php
class Namespace_Customwidget_Block_Lowestproducts
    extends Mage_Core_Block_Template
    implements Mage_Widget_Block_Interface {

}
If we add a _toHtml() method to our block, we could add a simple return of Testing to confirm our widget works.
<?php
class Namespace_Customwidget_Block_Lowestproducts
    extends Mage_Core_Block_Template
    implements Mage_Widget_Block_Interface {

    public function _toHtml() {
        return "Testing";
    }

}
If the widget instance has been created and selected to use on the home page, the string “Testing” should appear.
Of course, this isn’t entirely helpful, so let’s replace
public function _toHtml()
    {
        $html = "";
        $collection = Mage::getModel('catalog/product')
            ->getCollection()
            ->addAttributeToSelect('name')
            ->addAttributeToSort('price', 'ASC')
            ->setPageSize(5);

        $html .= "<ul>";
        foreach ($collection as $product) {
            $html .= '<li><div class="product_name">' . $product->getName() . ' - ' . Mage::helper('core')->currency($product->getFinalPrice(), true, false) . '</div></li>';
        }
        $html .= "</ul>";
        return $html;
    }
What if we wanted to let the merchant choose the number of products to display? The widget configuration gives us the ability to add parameters under the “parameters” node.
With that said, we can add a “products_per_page” parameter like so:
// app/code/local/Namespace/Customwidget/etc/widget.xml
<?xml version="1.0"?>
<widgets>
    <customwidget_lowestproducts translate="label description" type="customwidget/lowestproducts">
        <name>Cheapest Products</name>
        <description>Displays the cheapest products on the website</description>
        <parameters>
            <products_per_page translate="label">
                <required>1</required>
                <visible>1</visible>
                <value>5</value>
                <label>Number of Products per Page</label>
                <type>text</type>
            </products_per_page>
        </parameters>
    </customwidget_lowestproducts>
</widgets>
If we then go to the New Widget Instance area in the admin, or double click on the widget that is included in your CMS page to edit it, we can see that the parameters has been populated under the “Widget Options” section.
We can access our parameter within blocks by using the $this->getData(‘parameter_name’). We can also use the $this->hasData(‘parameter_name’) to check if the widget option has been populated in the admin.
So to use the value in the Widget Option, we need to edit our block file as follows:
const DEFAULT_PRODUCTS_PER_PAGE         = 5;

public function _toHtml() {
    $html = "";
    $collection = Mage::getModel('catalog/product')
        ->getCollection()
        ->addAttributeToSelect('name')
        ->addAttributeToSort('price', 'ASC')
        ->setPageSize($this->getProductsPerPage());

    $html .= "<ul>";
    foreach ($collection as $product) {
        $html .= '<li><div class="product_name">' . $product->getName() . ' - ' . Mage::helper('core')->currency($product->getFinalPrice(), true, false) . '</div></li>';
    }
    $html .= "</ul>";
    return $html;
}

public function getProductsPerPage() {
    if (!$this->hasData('products_per_page')) {
        $this->setData('products_per_page', self::DEFAULT_PRODUCTS_PER_PAGE);
    }
    return $this->getData('products_per_page');
}
If the view some of Magento’s default widget options, we can see that it is not just text parameters that we can use. We also have the ability to add:
- Dropdowns
- Yes/No
- Widget Choosers for Categories, Products and CMS Pages
To add a dropdown to our widget options, like our text option, we should add an additional parameter under the “parameters” node in our widget.xml configuration:
// app/code/local/Namespace/Customwidget/etc/widget.xml
<?xml version="1.0"?>
<widgets>
    <customwidget_lowestproducts translate="label description" type="customwidget/lowestproducts">
        <parameters>
            ....
            <selectdropdown translate="label">
                <label>Choose an Option</label>
                <visible>1</visible>
                <required>1</required>
                <type>select</type>
                <value>Some option</value>
                <values>
                    <someoption translate="label">
                        <label>Some option</label>
                        <value>some_option_1</value>
                    </someoption>
                    <someotheroption translate="label">
                        <label>Some Other Option</label>
                        <value>some_option_2</value>
                    </someotheroption>
                </values>
            </selectdropdown>
        </parameters>
    </customwidget>
</widgets>
For a Yes/No dropdown, we can use Magento’s adminhtml/system_config_source_yesno source model:
// app/code/local/Namespace/Customwidget/etc/widget.xml
<?xml version="1.0"?>
<widgets>
<customwidget_lowestproducts translate="label description" type="customwidget/lowestproducts">
<parameters>
....
<show_pager translate="label">
<visible>1</visible>
<label>Display Page Control</label>
<type>select</type>
<source_model>adminhtml/system_config_source_yesno</source_model>
</show_pager>
</parameters>
</customwidget>
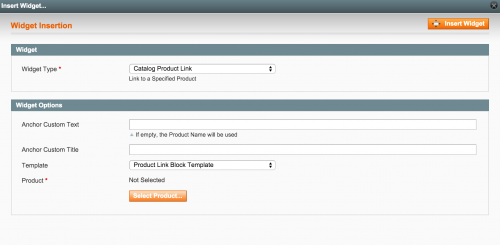
</widgets>For widget choosers:
<?xml version="1.0"?>
<widgets>
    <customwidget_lowestproducts translate="label description" type="customwidget/lowestproducts">
        <parameters>
            ....
            <id_path translate="label">
                <visible>1</visible>
                <required>1</required>
                <label>Product</label>
                <type>label</type>
                <helper_block>
                    <type>adminhtml/catalog_product_widget_chooser</type>
                    <data>
                        <button translate="open">
                            <open>Select Product...</open>
                        </button>
                    </data>
                </helper_block>
                <sort_order>10</sort_order>
            </id_path>
        </parameters>
    </customwidget>
<widgets>
Widget Choosers allow us to select particular categories, products or CMS pages within the same window as the widget configuration.
The catalog widget chooser block contains this method.
<?php
class
{
    ....
    public function prepareElementHtml(Varien_Data_Form_Element_Abstract $element)
    {
        $uniqId = Mage::helper('core')->uniqHash($element->getId());
        $sourceUrl = $this->getUrl('*/catalog_product_widget/chooser', array(
            'uniq_id' => $uniqId,
            'use_massaction' => false,
        ));

        $chooser = $this->getLayout()->createBlock('widget/adminhtml_widget_chooser')
            ->setElement($element)
            ->setTranslationHelper($this->getTranslationHelper())
            ->setConfig($this->getConfig())
            ->setFieldsetId($this->getFieldsetId())
            ->setSourceUrl($sourceUrl)
            ->setUniqId($uniqId);

        if ($element->getValue()) {
            $value = explode('/', $element->getValue());
            $productId = false;
            if (isset($value[0]) && isset($value[1]) && $value[0] == 'product') {
                $productId = $value[1];
            }
            $categoryId = isset($value[2]) ? $value[2] : false;
            $label = '';
            if ($categoryId) {
                $label = Mage::getResourceSingleton('catalog/category')
                    ->getAttributeRawValue($categoryId, 'name', Mage::app()->getStore()) . '/';
            }
            if ($productId) {
                $label .= Mage::getResourceSingleton('catalog/product')
                    ->getAttributeRawValue($productId, 'name', Mage::app()->getStore());
            }
            $chooser->setLabel($label);
        }

        $element->setData('after_element_html', $chooser->toHtml());
        return $element;
    }
}
We can see that the widget/adminhtml_widget_chooser block gets created.
Within the Mage_Widget_Block_Adminhtml_Widget_Chooser class, the _toHtml() method renders the chooser configuration.
Note: This article is based on Magento Community/Open Source version 1.9.