Magento Custom Payment Method
This article will guide you through the steps required to create a Magento custom payment method.
As with most things, Magento requires us to configure a custom module in order to register our payment method.
So to start with, add the custom module’s XML declaration file.
<?xml version="1.0"?>
<config>
<modules>
<Custom_Paymentmethod>
<codePool>local</codePool>
<active>true</active>
</Custom_Paymentmethod>
</modules>
</config>
Then add the module’s config.xml file. Here, we’ll need to define the block, helper and model prefix, as well as some default payment information that will be viewable within the admin area.
<?xml version="1.0"?>
<config>
    <global>
        <blocks>
            <paymentmethod>
                <class>Custom_Paymentmethod_Block</class>
            </paymentmethod>
        </blocks>
        <helpers>
            <paymentmethod>
                <class>Custom_Paymentmethod_Helper</class>
            </paymentmethod>
        </helpers>
        <models>
            <paymentmethod>
                <class>Custom_Paymentmethod_Model</class>
            </paymentmethod>
        </models>
    </global>
    <default>
        <payment>
            <custom>
                <title>Custom Payment Method</title>
                <active>1</active>
                <model>paymentmethod/custom</model>
                <order_status>pending</order_status>
                <allowspecific>0</allowspecific>
                <payment_action>sale</payment_action>
            </custom>
        </payment>
    </default>
</config>
Within the default nodes, we define some default information set against the custom payment method. The model paymentmethod/custom will be a model class Custom_Paymentmethod_Model_Custom that will extend Magento’s Mage_Payment_Model_Method_Abstract. But more on that later.
The helper file should be set up as per Magento’s convention.
<?php
class Custom_Paymentmethod_Helper_Data extends Mage_Core_Helper_Abstract {
}
Onto the system.xml file, which will be used for defining the configuration fields of the payment method within the System -> Configuration area in the admin.
<?xml version="1.0"?>
<config>
<sections>
<payment>
<groups>
<paymentmethod translate="label" module="paymentmethod">
<label>Custom Payment Method</label>
<sort_order>1</sort_order>
<show_in_default>1</show_in_default>
<show_in_website>1</show_in_website>
<show_in_store>0</show_in_store>
<fields>
<title translate="label">
<label>Title</label>
<frontend_type>text</frontend_type>
<show_in_default>1</show_in_default>
<show_in_website>1</show_in_website>
<show_in_store>0</show_in_store>
<sort_order>10</sort_order>
</title>
<active translate="label">
<label>Enabled</label>
<frontend_type>select</frontend_type>
<source_model>adminhtml/system_config_source_yesno</source_model>
<show_in_default>1</show_in_default>
<show_in_website>1</show_in_website>
<show_in_store>0</show_in_store>
<sort_order>20</sort_order>
</active>
<order_status translate="label">
<label>New order status</label>
<frontend_type>select</frontend_type>
<source_model>adminhtml/system_config_source_order_status</source_model>
<show_in_default>1</show_in_default>
<show_in_website>1</show_in_website>
<show_in_store>0</show_in_store>
<sort_order>30</sort_order>
</order_status>
<allowspecific translate="label">
<label>Payment from applicable countries</label>
<frontend_type>allowspecific</frontend_type>
<source_model>adminhtml/system_config_source_payment_allspecificcountries</source_model>
<show_in_default>1</show_in_default>
<show_in_website>1</show_in_website>
<show_in_store>1</show_in_store>
<sort_order>40</sort_order>
</allowspecific>
<specificcountry translate="label">
<label>Payment from Specific countries</label>
<frontend_type>multiselect</frontend_type>
<source_model>adminhtml/system_config_source_country</source_model>
<show_in_default>1</show_in_default>
<show_in_website>1</show_in_website>
<show_in_store>1</show_in_store>
<sort_order>50</sort_order>
</specificcountry>
</fields>
</paymentmethod>
</groups>
</payment>
</sections>
</config>
So now we have the configuration set up in the admin as follows.
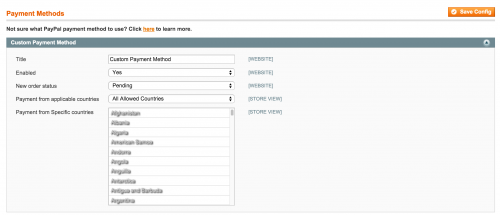
Note the source models used in system.xml determine the options returned in the dropdown. For example, the __ source model will use the Mage_Adminhtml_Model_System_Config_Source_Order_Status model class to return the options.
Although the custom payment method has been configured in the admin, we haven’t added any code to display the payment method on the checkout page.
Let’s start with the model. As mentioned earlier in the article, we need to create a Custom_Paymentmethod_Model_Custom class as per the model definition in the config.xml file.
<?php
class Custom_Paymentmethod_Model_Custom extends Mage_Payment_Model_Method_Abstract {
    protected $_code = 'custom';
    protected $_formBlockType = 'paymentmethod/form_custom';
    protected $_infoBlockType = 'paymentmethod/info_custom';

    public function assignData($data)
    {

    }

    public function validate()
    {

    }
}
Here we define a payment code which is just a unique name given to the payment method. This should match the node names given in config.xml under the xpath default/payments.
The $_formBlockType and $_infoBlockType variables state the block types that will be used for our payment method. Similar to the model naming convention, we need to add block files within the Custom/Paymentmethod/Form and Custom/Paymentmethod/Info locations respectively.
Two methods have also been set up: assignData() and validate(), which we’ll come back to shortly.
The block class files are as follows:
<?php
class Custom_Paymentmethod_Block_Form_Custom extends Mage_Payment_Block_Form
{
    protected function _construct()
    {
        parent::_construct();
        $this->setTemplate('paymentmethod/form/custom.phtml');
    }
}
<?php
class Custom_Paymentmethod_Block_Info_Custom extends Mage_Payment_Block_Info
{
    protected function _construct()
    {
        parent::_construct();
        $this->setTemplate('paymentmethod/info/custom.phtml');
    }
}
The ‘form’ block ensures that the template is rendered on the payment step on the checkout page, whereas the ‘info’ block ensures that the template is rendered on the sidebar on the right of the checkout page.
For the purpose of this article, a simple text field will be added for the custom payment method.
<div class="form-list" id="payment_form_<?php echo $this->getMethodCode() ?>" style="display:none;">
    <div>
        <label><?php echo $this->__('Custom Field') ?>*</label>
        <span>
            <input type="text" title="<?php echo $this->__('Custom Field') ?>" name="payment[custom_field]" value="<?php echo $this->htmlEscape($this->getInfoData('custom_field')) ?>" />
        </span>
    </div>
</div>
<div>
    <?php echo $this->getMethod()->getConfigData('message');?>
</div>
The custom.phtml template file will simply add the payment method title to the right sidebar block on the checkout page when the customer selects the custom payment method.
<p><?php echo $this->escapeHtml($this->getMethod()->getTitle()) ?></p>
Now that the templates are in place, we should see the custom payment method appear on the checkout page. There are still some steps to complete, including filling in the methods of the payment model.
<?php
class Custom_Paymentmethod_Model_Custom extends Mage_Payment_Model_Method_Abstract {
    protected $_code = 'custom';
    protected $_formBlockType = 'paymentmethod/form_custom';
    protected $_infoBlockType = 'paymentmethod/info_custom';

    public function assignData($data)
    {
        if (!($data instanceof Varien_Object)) {
            $data = new Varien_Object($data);
        }

        $this->getInfoInstance()->setCustomField($data->getCustomField());
        return $this;
    }

    public function validate()
    {
        parent::validate();
        $info = $this->getInfoInstance();

        if (!$info->getCustomField()) {
            $errorMsg = $this->_getHelper()->__("Custom Field is required");
        }

        if ($errorMsg) {
            Mage::throwException($errorMsg);
        }

        return $this;
    }
}
Now, we need to add an extra column for the custom field we’ve created for the payment method. This ensures the data gets saved in the quote and order record.
<?xml version="1.0"?>
<config>
<modules>
<Custom_Paymentmethod>
<version>1.0.0</version>
</Custom_Paymentmethod>
</modules>
<global>
....
<resources>
<paymentmethod_setup>
<setup>
<module>Custom_Paymentmethod</module>
</setup>
</paymentmethod_setup>
</resources>
</global>
</config>
And the install file.
<?php
$installer = $this;
$installer->startSetup();

$installer->getConnection()
    ->addColumn(
        $installer->getTable('sales/quote_payment'),
        'custom_field',
        Varien_Db_Ddl_Table::TYPE_TEXT,
        'Custom Payment Field'
    );

$installer->getConnection()
    ->addColumn(
        $installer->getTable('sales/order_payment'),
        'custom_field',
        Varien_Db_Ddl_Table::TYPE_TEXT,
        'Custom Payment Field'
    );

$installer->endSetup();
When refreshing any page in Magento and checking the sales_flat_quote_payment and sales_flat_order_payment tables in the database, you should see an additional custom_field column added.
And lastly, in order to convert the custom field data in the quote record to an order record, we need add in the fieldset configuration in the config.xml file.
<?xml version="1.0"?>
<config>
    <global>
        ....
        <fieldsets>
            <sales_convert_quote_payment>
                <custom_field>
                    <to_order_payment>*</to_order_payment>
                </custom_field>
            </sales_convert_quote_payment>
        </fieldsets>
    </global>
</config>
Note: this article is based on Magento Community/Open Source version 1.9.