Adding Google reCAPTCHA to Websites
Adding Google reCAPTCHA to websites has never been easier, but why is it needed in the first place? CAPTCHAs are becoming an increasingly popular component of web forms to stop robots from automatically submitting forms filled with spam-like content.
More recently, Google have developed their own version, reCAPTCHA, which unlike other CAPTCHAs, doesn’t require you to type out generated letters and number to prove you are human. Instead, reCAPTCHA requires a single click from the user to confirm they are not a robot. Google uses technology that monitors how a user interacts with reCAPTCHA before, during, and after, to determine whether that user is a human.
One of the major benefits of using Google’s product over standard CAPTCHAs is that human users don’t have to spend extra time solving the CAPTCHA, which may or may not work in some cases. So conversion rates are higher.
Adding Google reCAPTCHA to your Site
Adding reCAPTCHA to your website is as simple as adding a JavaScript library to your web page and entering in a generated Site Key from Google for your domain name.
Head to the Google reCAPTCHA page and click on the Get reCAPTCHA button.
Sign in with your Google account, and you’ll arrive on a page where you can register your website to use reCAPTCHA.
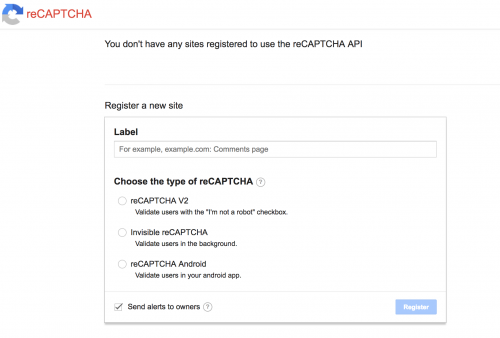
By choosing one of the reCAPTCHA options to use (V2, Invisible, Android), you’ll then be able to add your domain name.
After registering your domain, you’ll then be given a site and secret key from Google, as well as instructions for implementing the reCAPTCHA client side.
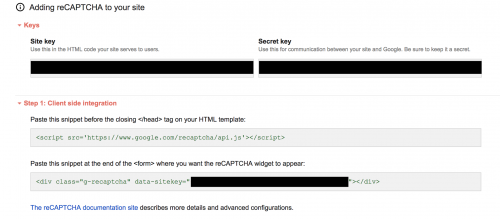
Simply add the <script src='https://www.google.com/recaptcha/api.js'></script> and <div class="g-recaptcha" ..> lines into your HTML. If the reCAPTCHA being added is part of a form, you’ll probably want to add the <div> element just before the form’s submit button, within the pair of <form> HTML tags.
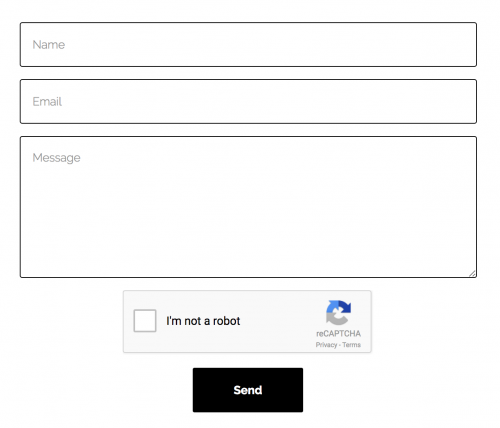
An example of how the markup might look can be seen below.
<form class="site-form">
    <input type="text" class="form-control" name="name" placeholder="Name" required="">
    <input type="email" class="form-control" name="email" placeholder="Email" required="">
    <textarea class="form-control" name="message" rows="3" placeholder="Message" required=""></textarea>
    <div class="g-recaptcha" data-sitekey="[your_site_key]"></div>
    <button type="submit" class="btn btn-submit">Send</button>
</form>
If you’ve added the elements correctly, in addition to successfully verifying your domain name, you should see the reCAPTCHA show correctly on your website.
You’ll know if you’ve followed the steps correctly as the reCAPTCHA will show a checkbox with the I'm not a robot text. If the reCAPTCHA has been misconfigured, an error message will show within it instead.
Not all reCAPTCHAs have to look the same. You can configure it to have either the light (default) or dark theme.
Simply add data-theme="dark" to the <div class="g-recaptcha" .. > element to use the dark theme instead.
There are a couple of other useful configuration options to use with reCAPTCHA, including data-type, which specified the type of CAPTCHA to serve. The options are image (default) and audio. Lastly, data-size specifies the size of the widget, with the options normal (default) and compact.
With knowledge of how to implement and configure the reCAPTCHA, you will need to validate that the user has passed the reCAPTCHA test.
Google provides a g-recaptcha-response parameter that can be retrieved within the POST variable of your chosen programming language.
For example, if using PHP, then you could obtain the g-recaptcha-response value with $_POST['g-recaptcha-response']. This parameter should be populated with a token value if the user has passed the validation.
Having trouble with implementing reCAPTCHA or have a question? See the Frequently Asked Questions page to see the most common questions asked.