Express.js Login Page Example
This post will look show an Express.js login page example using the EJS template engine and connecting to a MongoDB database.
This example will be using code from previous articles, so if you do not already know how to get started with Express.js or how to configure a route, go and check out how to do so!
The first thing that this example will be doing is changing the view engine to use EJS templates. This is done from within the app.js file.
// app.js

// view engine setup
app.set('views', path.join(__dirname, 'views'));
app.set('view engine', 'ejs');
Ensure that you have the ejs package installed within your project’s node_modules directory if you haven’t done so already
$ npm install ejsThe Express Application Generator creates .jade view files as jade is the default template engine. You can remove these jade files from within the views directory and replace them with .ejs files to suit the project’s new template engine.
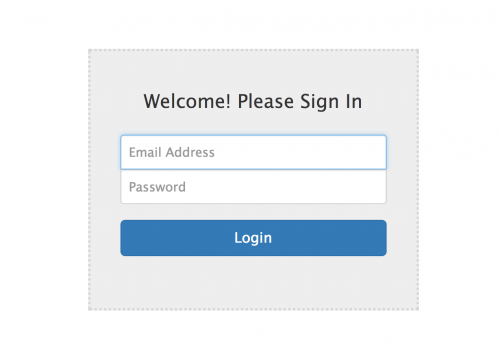
Within the index.ejs file, some HTML markup will be added showing the login form that will be used.
// views/index.ejs
<!DOCTYPE html>
<html>
<head>
    <meta charset="utf-8">
    <meta http-equiv="x-ua-compatible" content="ie=edge">
    <title>Login Example</title>
    <meta name="description" content="">
    <meta name="viewport" content="width=device-width, initial-scale=1">

    <link rel="stylesheet" href="https://maxcdn.bootstrapcdn.com/bootstrap/3.3.7/css/bootstrap.min.css">
    <link rel="stylesheet" href="../stylesheets/style.css">

    <script src="https://ajax.googleapis.com/ajax/libs/jquery/3.2.1/jquery.min.js"></script>
    <script src="https://maxcdn.bootstrapcdn.com/bootstrap/3.3.7/js/bootstrap.min.js"></script>
</head>
<body>
    <div class="container">
        <div class="wrapper">
            <form action="/" method="post" name="Login_Form" class="form-signin">
                <h3 class="form-signin-heading">Welcome! Please Sign In</h3>

                <input type="text" class="form-control" name="email" placeholder="Email Address" required="" autofocus="" />
                <input type="password" class="form-control" name="password" placeholder="Password" required=""/>

                <button class="btn btn-lg btn-primary btn-block" name="Submit" value="Login" type="Submit">Login</button>
            </form>
        </div>
    </div>
</body>
</html>
Within the style.css file, some CSS rules have been added to style the login form a bit better.
// public/stylesheets/style.css
body {
  padding: 50px;
  font: 14px "Lucida Grande", Helvetica, Arial, sans-serif;
}

a {
  color: #00B7FF;
}

.wrapper {
  margin-top: 80px;
  margin-bottom: 20px;
}

.form-signin {
  max-width: 420px;
  padding: 30px 38px 66px;
  margin: 0 auto;
  background-color: #eee;
  border: 3px dotted rgba(0,0,0,0.1);
}

.form-signin-heading {
  text-align:center;
  margin-bottom: 30px;
}

.form-control {
  position: relative;
  font-size: 16px;
  height: auto;
  padding: 10px;
}

input[type="text"] {
  margin-bottom: 0px;
  border-bottom-left-radius: 0;
  border-bottom-right-radius: 0;
}

input[type="password"] {
  margin-bottom: 20px;
  border-top-left-radius: 0;
  border-top-right-radius: 0;
}
Notice the form action attribute within the HTML markup suggests that the form will attempt to post to itself. In order for this post request to work, we have to configure it within the application.
Within app.js, add the post route just under the existing app.use declarations.
// app.js

app.use('/', routes);
app.use('/users', users);

// Here is our post route
app.post('/', function(req, res) {
});
In order for the application to authenticate users, it needs to have a connection to a database. This example connects to a MongoDB database and the connection is covered in more detail here.
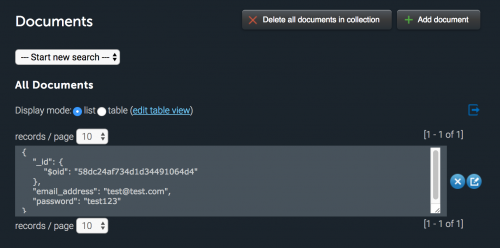
In mLab you can add collections to your database. In the screenshot below a users collection was added.

Within this collection, you can add documents which essentially is some data for a user for the application to check details on. Below is a very basic (and unsecure!) example of a document containing an email_address and password field.
To obtain this collection within app.js, you can assign a variable to the collection from within the callback to the initial MongoDB connection.
// app.js

var MongoClient = require('mongodb').MongoClient;

var userCollection;
MongoClient.connect('mongodb://:@ds137540.mlab.com:37540/', function (err, db) {
  if (!err) {
    console.log('MongoDB connected');
    userCollection = db.collection('users')
  } else {
    throw err
  }
});
We are now ready to start writing the code to authenticate a user using the form.
N.B: It is worth installing the async module to assist you working with asynchronous JavaScript.
$ npm install asyncAnd then in app.js…
// app.js

var async = require('async');
Firstly we use the userCollection variable and use the findOne method to find a record in the database that matches the email address sent from the form.
Notice how "email_address" matches the name of the field in the database. req.body.email contains the data from the email form field.
// app.js

app.post('/', function(req, res) {
  async.waterfall([
    function (callback) {
      userCollection.findOne({
        "email_address": req.body.email
      }, function (err, result) {
        if (err) {
          console.log(err);
          res.send({error: "An error has occurred"});
        } else {
          if (result == null) {
            res.send({"error": "This email address is not recognised, please check you have entered your email correctly"});
          } else {
            console.log("Email recognised");
            callback(null, result);
          }
        }
      });
    }
  ])
}
If the database recognises the email address, we can then check the password.
// app.js

app.post('/', function(req, res) {
  async.waterfall([
    function (callback) {
      userCollection.findOne({
        "email_address": req.body.email
      }, function (err, result) {
        if (err) {
          console.log(err);
          res.send({error: "An error has occurred"});
        } else {
          if (result == null) {
            res.send({"error": "This email address is not recognised, please check you have entered your email correctly"});
          } else {
            console.log("Email recognised");
            callback(null, result);
          }
        }
      });
    },
    function (result, callback){
      var password = result.password;
      if (req.body.password !== password){
        res.send({"error":"Sorry your password is incorrect"});
      } else {
        res.send({success:"Logged in successfully"});
      }
    }
  ])
});
After the email gets recognised, the result variable contains the data from the record found in the database, which includes the unique ID, email address and password fields.
Therefore the password can be accessed using result.password, and this is checked with the password sent from the form data, req.body.password.
If the password from the database matches the input password, we can send a response message stating a successful login.