Magento 2 Theme Development
Welcome to the first part of the Magento 2 Theme Development series. This series will aim to assist developers in making several frontend development changes to a custom theme. The custom theme being created and used will be a child theme of the Magento/blank theme.
Note: If you haven’t already done so, set your store to developer mode to ensure that the theme changes are reflected on the site instantly!
To begin, register a create a new theme. Start by adding the a new vendor and theme name, and including a registration.php file.
// app/design/frontend/Siphor/custom/registration.php

<?php
\Magento\Framework\Component\ComponentRegistrar::register(
    \Magento\Framework\Component\ComponentRegistrar::THEME,
    'frontend/Siphor/custom',
    __DIR__
);
Next add a theme.xml file.
// app/design/frontend/Siphor/custom/theme.xml

<theme xmlns:xsi="http://www.w3.org/2001/XMLSchema-instance" xsi:noNamespaceSchemaLocation="urn:magento:framework:Config/etc/theme.xsd">
    <title>Siphor Custom</title>
    <parent>Magento/blank</parent>
</theme>
Now that the minimum requirements for creating a new theme are met, enable this theme within the admin under Content -> Design -> Configuration, and choose the theme to be active from the dropdown menu.

To learn more about registering and creating a new theme, check this article. LINK
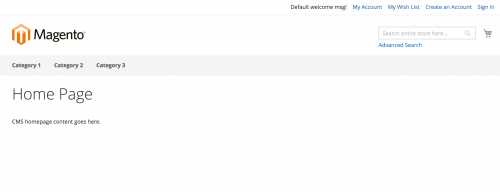
Let’s assume that the site needs some callout text, that sits just below the top menu where the categories would show. Currently on the custom theme, we have no way of seeing where the top menu is supposed to show as no categories have been added.
Add a few categories within the admin under Products -> Categories so they are visible on the website.
The template that renders the category top menu to defined in the default.xml layout file in the Magento_Theme directory within the Magento/blank theme files.
// vendor/magento/theme-frontend-blank/module-theme/view/frontend/layout/default.xml

<?xml version="1.0"?>
<page xmlns:xsi="http://www.w3.org/2001/XMLSchema-instance" xsi:noNamespaceSchemaLocation="urn:magento:framework:View/Layout/etc/page_configuration.xsd">
    <body>
        <referenceContainer name="page.top">
            <block class="Magento\Framework\View\Element\Template" name="navigation.sections" before="-" template="Magento_Theme::html/sections.phtml">

                ....

                <block class="Magento\Framework\View\Element\Template" name="store.menu" group="navigation-sections" template="Magento_Theme::html/container.phtml">
                    <arguments>
                        <argument name="title" translate="true" xsi:type="string">Menu</argument>
                    </arguments>
                    <block class="Magento\Theme\Block\Html\Topmenu" name="catalog.topnav" template="html/topmenu.phtml" ttl="3600" before="-"/>
                </block>

                ....

            </block>
        </referenceContainer>

        ....

    </body>
</page>
Within this file, a top.container container is also defined.
<container name="top.container" as="topContainer" label="After Page Header Top" htmlTag="div" htmlClass="top-container"/>We can use this container reference to add our header callout template.
So within the custom’s theme directory, create a Magento_Theme/layout directory, and add a default.xml that will be used to extend Magento/blank’s default.xml layout file.
// app/design/frontend/Siphor/custom/Magento_Theme/layout/default.xml

<?xml version="1.0"?>
<page xmlns:xsi="http://www.w3.org/2001/XMLSchema-instance" xsi:noNamespaceSchemaLocation="urn:magento:framework:View/Layout/etc/page_configuration.xsd">
    <body>
        <referenceContainer name="top.container">
            <block class="Magento\Framework\View\Element\Template" name="custom.header.callout" as="header_callout"
                   template="Magento_Theme::page/html/header_callout.phtml"/>
        </referenceContainer>
    </body>
</page>
The default.xml means that layout updates defined in this file will be rendered on all pages, which is what we want for our callout.
Now create the template file within the Magento_Theme’s templates directory.
<div class="header-callout">Free shipping on orders over £50!</div>Refresh your store and you should now see the callout appearing just below the top menu.
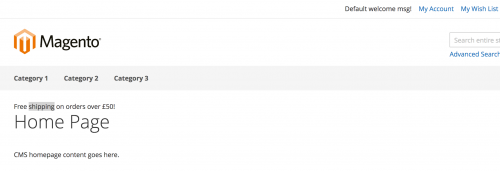
Currently the callout hasn’t been styled with CSS, and it would be nice to make it stand out a bit more.
Add a CSS file in the default_head_blocks.xml file.
// app/design/frontend/Siphor/custom/Magento_Theme/layout/default_head_blocks.xml

<page xmlns:xsi="http://www.w3.org/2001/XMLSchema-instance" xsi:noNamespaceSchemaLocation="urn:magento:framework:View/Layout/etc/page_configuration.xsd">
    <head>
        <css src="css/custom.css" />
    </head>
</page>
You can then add a CSS file within a web/css directory in your custom theme’s directory. Magento 2 will actually allow you to use a .less extension rather than .css, should you wish to use the LESS preprocessor.
// app/design/frontend/Siphor/custom/web/css/custom.less

.header-callout {
  background-color: #f5f5f5;
  border: 1px solid #000;
  margin-bottom: 20px;
  padding: 5px;
  text-align: center;
}
Regenerate the static content generated within the pub/static directory of your Magento project, refresh your store and you should see the styles reflected for the header callout.
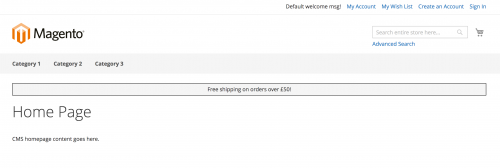
Lastly, let’s remove the Create an Account link from the links section in the top right corner of the website.
The link initially gets added within Magento’s Magento_Customer module.
// vendor/magento/module-customer/view/frontend/layout/default.xml

<?xml version="1.0"?>
<page xmlns:xsi="http://www.w3.org/2001/XMLSchema-instance" xsi:noNamespaceSchemaLocation="urn:magento:framework:View/Layout/etc/page_configuration.xsd">
    <body>
        <referenceBlock name="top.links">

            ....

            <block class="Magento\Customer\Block\Account\RegisterLink" name="register-link">
                <arguments>
                    <argument name="label" xsi:type="string" translate="true">Create an Account</argument>
                </arguments>
            </block>

            ....

        </referenceBlock>

        ....

    </body>
</page>
To extend this default.xml file, create a Magento_Customer directory within your theme’s directory, following the same folder structure of the default.xml file created in the Magento_Theme directory.
Within this default.xml, you can reference the register-link link block and use the remove attribute setting it to true.
// app/design/frontend/Siphor/custom/Magento_Customer/layout/default.xml

<?xml version="1.0"?>
<page xmlns:xsi="http://www.w3.org/2001/XMLSchema-instance" xsi:noNamespaceSchemaLocation="urn:magento:framework:View/Layout/etc/page_configuration.xsd">
    <body>
        <referenceBlock name="register-link" remove="true" />
    </body>
</page>
That wraps up Part 1 of this Theme Development series. In the next part, we’ll look at static blocks and how they can be integrated into a theme.
Note: This article is based on Magento CE version 2.1.