Private Repositories using Satis with MAMP
It might be common for developers to host their own private packages for projects without having to submit them to popular public websites such as Packagist. Here’s how to set up private repositories using Satis with MAMP, for local testing.
As per the Composer documentation, you can install Satis via command line.
From your home directory, run the below.
$ composer create-project composer/satis:dev-master --keep-vcsThis will create a satis directory within your home directory.
Within the satis directory, there should be a bin directory, and within this, a satis executable file that is used to build a Satis repository as used in the below command (when running it from your home directory).
$ php bin/satis build <configuration-file> <output-dir>The configuration file will contain generic information about your private repository generator such as the name and homepage, and also a list of your private repositories.
By default, Satis looks for a satis.json configuration file in the same directory level as the satis executable (within bin).
An example of the satis.json might look like the following.
{
  "name": "My Packages",
  "homepage": "http://packages.local",
  "repositories": [
    { "type": "git", "url": "git@bitbucket.org:[username]/[your-repository].git" }
  ],
  "require-all": true
}
The above indicates an example of a Bitbucket repository, and you can add/edit the URLs depending on where you host your repository.
As this Satis setup is happening locally, Satis should be able to fetch your repositories without the need to authenticate (assuming you are authorised to access your own repositories).
If not, then you will need to add in your public SSH key into your hosted repository’s configuration area.
The <output-dir> will specify the directory in which the Satis repository generator is generated, and when the build command is run, will contain a generated index.html file that will contain the repositories added to satis.json.
Amend the <output-dir> to suit your needs, and then within MAMP’s httpd-vhosts.conf file, add in a vhost entry for the output directory specified.
// Applications/MAMP/conf/apache/extra/httpd-vhosts.conf

<VirtualHost *:80>
    ServerName packages.local
    ServerAlias www.packages.local
    DocumentRoot "<output-dir>"
</VirtualHost>
Ensure that a hosts entry has been added for packages.local, restart MAMP and run the build command, you should notice when heading to http://packages.local, your Satis repository generator shows.
By default, Satis will not fetch updates from your repositories automatically, and so you could configure the build command to run on a cron.
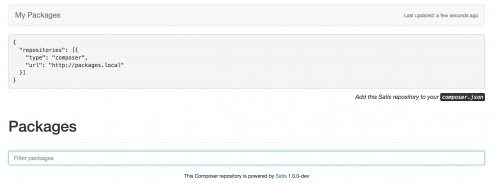
To actually use your private repositories in a PHP project, within your project’s root composer.json file, ensure the Satis URL is added within the repositories configuration.
"repositories": [
    {
        "type": "composer",
        "url": "http://packages.local"
    }
],
Because http://packages.local is served over HTTP, you will need to add in the secure-http entry to composer.json and set the value to false.
"repositories": [
    {
        "type": "composer",
        "url": "http://packages.local"
    }
],
"config": {
    "secure-http": false
},
This will allow Composer to fetch your repositories, although Composer will generate a warning for using an unsecure URL. You can set up an SSL in MAMP by following this post.
And finally, to include a specific repository to your project. Within composer.json, locate the require-dev line and add in your repository name.
"require-dev": {
    "vendorname/your-repository-name": "dev-master"
}
Note that dev-master will pull down the latest git commit from the master branch, and you can change this to a version number, e.g. 1.0.0, if you’ve tagged your Git commit in this way.
When running composer update, your repository will be readily available within the vendor/vendorname directory of your project.